Quick Reference
- Identify your Support
Astronomer. If you do not know who your assigned SA is,
you can find the name on the observing schedule posted in the
Remote Ops I room in Waimea (or available online).
Contact numbers for all members of the SA team are posted beside
the white board.
- Arrange a meeting. Your
support astronomer will meet you around 2:00pm HST in Remote
Ops I unless a different arrangement is made in
advance.
- Review your program. You should make
sure to discuss the following points with your SA:
- Plans for afternoon and nighttime calibrations.
- Instrument issues, recent changes and latest news (e.g. focus procedures, recent
problems, setups, etc.).
- Telescope issues; in particular, devise a plan for
performing telescope nightime focus procedures (a.k.a. MIRA or Autofoc), which are
optimized for your scientific needs and use of the
instrument.
- Any other questions, requests and needs you may have.
- Consult the on-line
Keck I observing schedule. Find the listing for
today's date (note that the dates are HST, not UT dates).
- The eighth column of the table will indicate the account
you have been assigned. For example, if it reads
LRIS(1), your account is lris1. Enter
this account name (in lowercase) when logging into Keck
computers. Your SA will supply you with the password for
your account.
Regardless of whether you'll observe from Waimea or a mainland
observing site, all of your LRIS software runs within VNC desktops. VNC servers for your
run should be up and running five days prior to your run. Please
follow the appropriate set of steps below to launch your VNC
viewers on the primary and secondary workstations.
[FN] your SA will help you with the
first startup of the system.
Please follow the instructions for your particular site (Waimea or one of
our remote observing stations).
About your VNC desktops
You should see 4 VNC desktops come up labeled "control0", "control1",
"control2", and "telstatus". They all have a blue background. This is
unlike the previous (prior to mid-2019) setup which had 8 VNC desktops with
a mix of tan and blue backgrounds.
You are not permitted to operate LRIS until
the summit staff have completed their checkout procedure!
Please follow these steps to determine when LRIS has been released
for your use:
- Launch the Firefox browser from the desktop menu by
selecting Firefox - LRIS Home Page.
- Click on the link labeled Instrument
Ready? (available on the side menu on any LRIS webpage) to
access the SIAS webpage.
- In the upper right of the SIAS webpage check the instrument
status. If the displayed message reads LRIS NOT READY on a red background, then
LRIS has not been released for your use. If it reads LRIS READY on a green background, then the
instrument is ready for use. If it is past the nominal
instrument release time (2:00pm weekdays or 3:00pm weekends), please
contact your SA for assistance.
Note: you will not be able to take any dome calibrations
until the telescope has been released; this generally
occurs by 4:00pm HST.
- Start the LRIS Software.
Select LRIS Control Menu > Start All
LRIS Control. from the vnc desktop menu. An
xterm window will pop up with the following message:
	Welcome to the LRIS initialization script.  You should ALWAYS run this script
	at the start of any observing nights of your run to undo any changes that the previous
	observer made to LRIS and to re-initialize hardware ans software.
The script is self-explanatory,
but in case you want to know more, follow the link.
When finished, the script will beep and print the message:
Instrument initialization completed --- please proceed with observing
and the xterm window will disappear.
- Verify windows.
Check that the following windows appear:
Left screen
(control0 desktop)
|
Center screen
(control1 desktop)
|
Right screen
(control2 desktop)
|
- XLRIS widget
- CCD log window
- Motor log window
- Object.tcl window
- PIG - Program Interface GUI
|
- blue XPOSE gui
- blue DS9 image display
- instrument compass rose
- ADC Status Gui
- Eventsounds
|
- red XPOSE gui
- red DS9 image display
|
- Select sounds.
The eventsounds GUI (found on your control1 desktop)
allows you to choose which sounds
to play when images are done exposing and reading out. Click
on the available menus to select the sounds of your choice for
your late-night entertainment.
Check your secondary host
machine. If you are observing at a mainland site and your primary
computer is equipped with four screens, then this single machine
serves as both your primary and secondary host.
- FACSUM/XMET.
If your team includes remote observers who cannot view FACSUM
and XMET on the gorgeous wall monitors in the Waimea Remote
Ops room, then launch them within VNC:
- Switch to your telstatus VNC desktop
- Right-click on the background menu and select
K1 Telescope Status Menu >
FACSUM
- Right-click on the background menu and select
K1 Telescope Status Menu >
XMET
- Launch MAGIQ Guider Interface.
- Right-click on the background menu and select K1 Guider Eavesdropping > Start Observer UI
The following elements are loaded into LRIS upon request:
- Verify red filters.
On the XLRIS widget, click the
filter selector button (marked F), bringing up a red filter menu.
Read through the list of available filters and make sure that
all of the red filters you will need tonight are listed. If
not, alert your SA immediately. Note: except for
certain narrow-band filters, all available blue filters are
currently loaded into the instrument.
- Verify gratings.
On the XLRIS widget, click the
grating selector button (marked G), bringing up a grating menu. Read
through the list of available gratings and make sure that all
of the gratings you will need tonight are listed. If not, alert
your SA immediately.
- Verify slitmasks.
On the XLRIS widget, click the
slitmask selector button (marked S), bringing up the slitmask menu.
Read through the list of available slitmasks and make sure
that all of the slitmasks you will need tonight are listed.
If not, alert your SA immediately.
- Verify CCD parameters.
| Parameter |
Red CCD |
Blue CCD |
| Readout Window |
See the command line section for the red ccd. The scripts control the number of amplifiers only.
|
Windowing is available in a
limitted format. You may only use one of the CCDs (left or right).
See windowing and
binning and the XPOSE GUI for
advice and instructions.
|
| Gain |
Gain settings cannot be changed |
Gain settings cannot be changed on the
blue side
|
| Binning |
Several binning are allowed. Please see the command line section for the red ccd.
|
Any binning is allowed. Click on WIN..., set the X and Y binning factors and the
W and H parameters. See windowing and
binning and the XPOSE GUI for
advice and instructions. |
Look at the ADC Status GUI in the control1 VNC.
- Check that the ADC Mode is "Track" and not "Halt".
- If the ADC Mode is "Halt" the OA or SA should re-init the ADC.
- The Status should say "Tracking" unless the telescope is below the minumum correction elevation and says "At Max".
You now have the choice of maintaining paper or electronic logs
for your observing run.
Electronic logsheets
The Keck Observing Log Archive (KEOLA) maintains an on-line log of
your run which you can access through the browser window to view
or edit. This log is generated whether or not you choose to use
it, and is only accessible from within the Keck network, not from
outside, so if you are observing remotely you must launch a
browser within VNC to access the electronic logs. For full
instructions, please refer to the KEOLA
webpage.
Paper logsheets
If you prefer physical logsheets for note-taking, now would be a
good time to prepare them. You can preview and print out copies
of logsheets from the computer.
To assist in your logging, you may find it helpful to launch the
obslog window which provides a summary of your LRIS
exposures. From the LRIS background menu, select LRIS
Utilities > Obslog loop to launch this window.
Test exposures are taken to ensure that everything is fine with
the instrument and the light path. You can skip this step if you
will be acquiring afternoon calibrations (bias and dark frames,
flatfield images, etc.) for your science program.
If you do not want to save the test images, turn off the write
to disk option (only available on the blue channel): in the Xpose GUI, click on Disk... and select Disabled for the Disk Write option (left
hand side). Do not forget to re-enable disk writing when you
take your calibrations!
The steps below assume that you are familiar with the use of
the XLRIS, XPOSE, and ds9 GUIs. If not, then please
follow the links to read more the operation of these GUIs. Your
SA will also be glad to provide you with training the use of these
tools.
- Take test bias exposures.
For both red and blue side, in the XPOSE GUI:
- Close the trapdoor.
- Set exposure time to 0.
- Click on the Start Dark button.
- Once the frames are written, inspect the frames.
- If you see something unusual, contact your SA.
- Take test illuminated exposures.
Configure for imaging on both side. This can be done via a script: in the lrisserver window type
take_test_flat and hit Enter.
Alternatively, you can configure the instrument and manually take
the images:
| Red-side settings |
Blue-side settings |
- Set grating = mirror
- Set red filter = R
|
- Set dichroic = 560
- Set grism = clear
- Set blue filter = G
|
- Set slitmask = direct.
- Switch on the neon lamp.
- Set red and blue exposure time to 1 sec.
- Take one red and one blue frame (Click on START in the XPOSE GUIs)
- While images are reading put switch off the Neon lamp.
- Check that light is seen in the frames.
- If you see something unusual (e.g. no light), contact your SA.
Observers using LRIS in Multi Object Spectroscopy (MOS) mode
should take images of their masks and verify that they correspond
to what was requested. Although errors are rare, it is possible
for the wrong masks to be loaded, or for the correct masks to be
loaded backwards into a slitmask holder; thus, your diligence is
essential to ensure that the masks are correctly loaded. If an
error is caught early enough in the afternoon, there is usually
time to correct it. If you discover any problems with your masks,
alert your SA immediately. Please note that you should repeat
this procedure before each night of your run, even if you are
using the same masks.
Automated Procedure
Follow these steps to verify your slitmasks slitmasks with the LRIS Slitmask Imaging Tool:
- From the desktop menu, select LRIS
Utilities > Slitmask Imaging Tool
to launch the LRIS Slitmask
Imaging Tool (Linux)
- Use the check boxes on the GUI to indicate which masks to
image.
- Click GO to acquire direct
images of the masks.
Manual Procedure
Alternatively, if you prefer NOT to use our automatic GUI, you may
manually cycle through the slitmasks.
The following instructions for manually verifying slitmasks
assume use of the blue side.
- Configure the lris blue side in
imaging mode:
- Close the trapdoor.
- Set grism = clear.
- Set filter = G.
- Switch on the Argon lamp.
- Insert the slitmask you wish to image.
- Set exposure time to 1 sec.
|
- Take one exposure.
- Verify slits: verify that all slits and alignment holes are in their expected positions and
that all slits appear clean. If dirty slits are suspected, they can be removed and cleaned if summit
personnel are alerted soon enough.
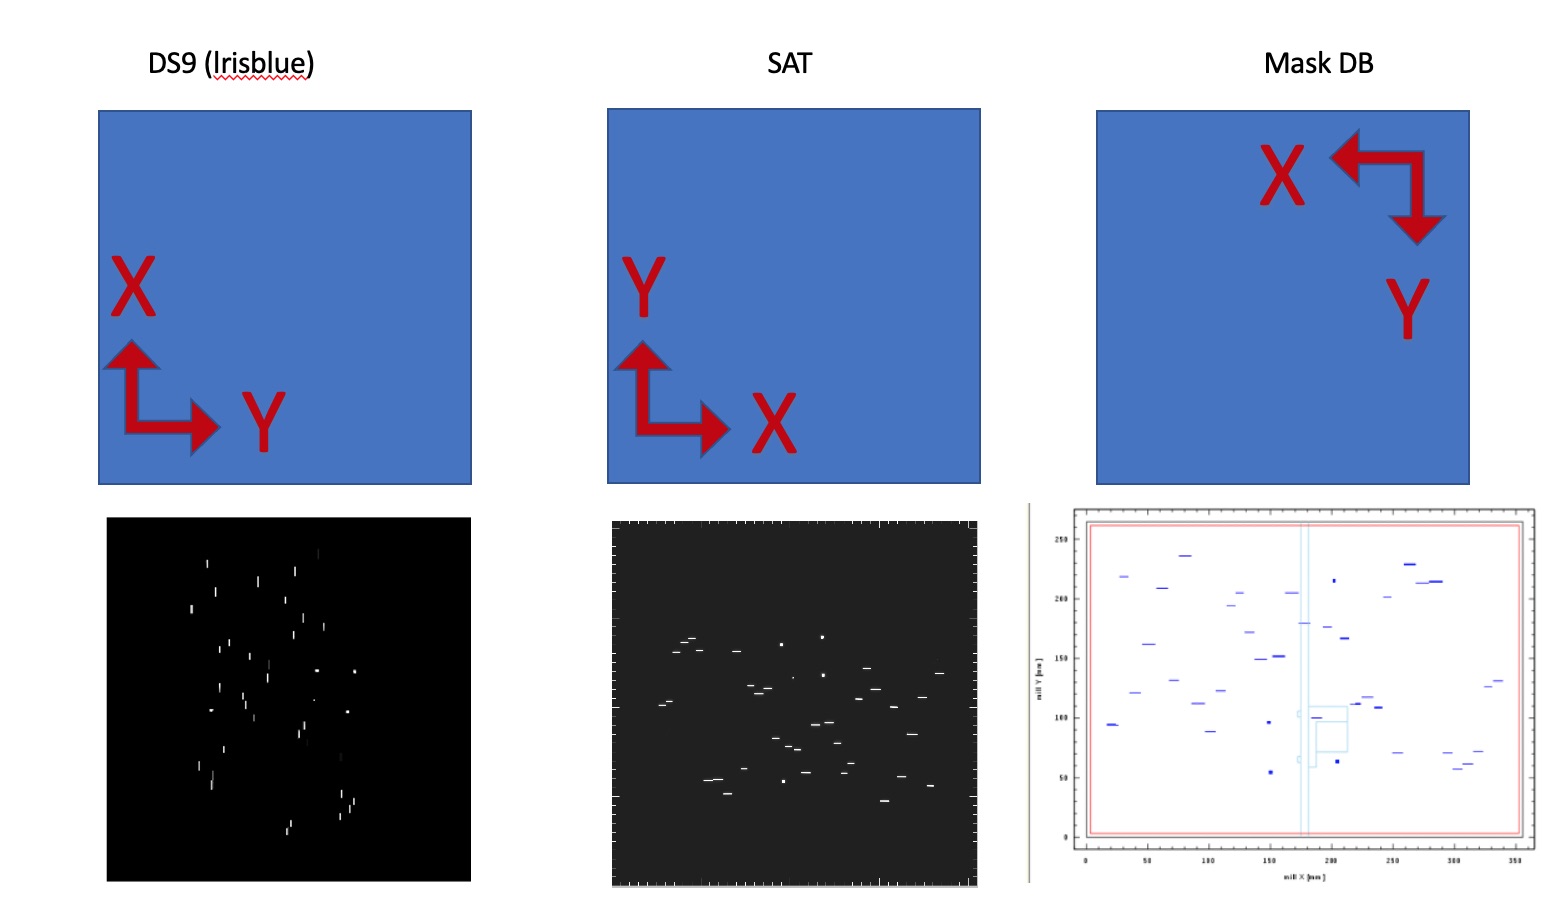
- Verify the masks Verify thedesign by comparing what is seen in ds9 or the SAT with the mask design. The following picture shows the relative orientation with respect to the plot available in the Mask Data Base.
- Repeat: repeat the preceding steps for your remaining slitmasks.
In this step, we define the positions of the alignment boxes and create coordinate files for use during the night.
- Launch SAT.
Start the Slitmask
Alignment Tool as follows:
- From the desktop menu, select LRIS
Utilities > Slitmask Alignment Tool (Linux)
- Identify boxes.
Follow the Identify Boxes steps at: Identify
Slitmask Alignment Procedure
- Create starlist.
This can be accomplished in either of two ways:
- Automatically via maskstatlist program.
Slitmask observers can generate a starlist for all of the
currently-loaded user masks using a new script which
retrieves the mask center coordinates stored in the slitmask
database. To do so, select LRIS
Utilities > Generate Mask Starlist from the
background menu. This will run the maskstarlist
program, which reads the names of all custom slitmasks
loaded in LRIS, looks up the RA, Dec, and PA, then stores
that information in a starlist file (named
starlist.YYMMDD) in your home directory
on the LRIS host machine, lrisserver.
- Manually. Use your favorite test editor to
create and format your starlist as described in these instructions.
- Transfer starlist.
-
The preferred way to transfer your starlist to Keck is via
your
observer login page. Doing so will install your
starlist file into the directory
/kroot/starlists/web/username.
- If you prefer not to use the observer login page,
validate and install your starlist by selecting the item
Instrument Utilities > Install
Starlist from the desktop menu. This script will
check the syntax of your starlist and copy it into the
appropriate directory. See install starlist
instructions for details.
- Verify starlist.
To make sure that your starlist file is properly formatted,
please do the following:
- On the Slitmask Alignment Tool's Guider Coarse Align tab, select Load Starlist and select your starlist
file. Confirm that all targets load correctly and no
warnings are issued.
- On the MAGIQ UI, select File >
Load Private Starlist and select your starlist file.
Confirm that all targets load correctly and no warnings are
issued.
If this is your first night or the gratings have been swapped, you
will need to determine the central wavelength for spectroscopic
observations. The wavelength range on the blue side is determined
by the choice of grism, while the red gratings have adjustable
tilt that allows modications of the eavelength range. Check the
dispersive elements web
page to learn more about the accesible wavelength ranges for each
grating and grism.
Each grating can be inserted in any one of the four available
grating ports. Since the ports have slightly different zeropoints,
the central wavelength selected by means of the XLRIS GUI
can be off the mark by a few hundred Ångstroms. Accordingly,
using the grating angle settings from a previous run will probably
not yield the same central wavelength, unless the grating of
interest was installed in the same port each time. It is therefore
recommended that you acquire some test arc lamp frames and check
that the wavelength range is as desired. Furthermore,
it is
recommended to use a wavelength
script to set the
central wavelength.This script is run from the command line on a
LRISserver xterm.
The arcplots tool can
generate custom arc line plots for any combination of grating,
dichroic, lamps, and central wavelength, and thus is useful for
wavelength determination.
The following instructions assume use of the
red side.
- Configure the red side in spectroscopic mode, as required by your science program
- Select one of your slitmasks or the chosen longslit.
- Select the grating you will be using for your science.
- Select the filter you will be using for your science.
- Specify your
desired central wavelength.
- Close the trapdoor.
- Turn on the desired arc lamps. The Ar
lamp in particular has a spectrum well-suited to
wavelength calibration.
- Set exposure time to 1 sec.
|
- Take an exposure in spectral
mode with the red-side detector system.
- Make a row plot in ds9 (click
and drag left mouse to create a vector plot) and check the peak
counts. If needed, increase the exposure time and take another
exposure to get sufficient signal.
- Compare a row plot from your image to the plot displayed by ARCPLOTS for the same instrument setup.
Identify key features and estimate the central wavelength. If the wavelength coverage is not optimal, adjust the Wavelen or MSWavelen
settings as required and take another exposure.
- Repeat the procedure for each slitmask/grating combination needed for your science program.
If your science program requires multiple instrument setups during the night, it is recommended to create setup files.
There are various ways to create setup files. We present here the two simplest ones:
- Instrument State files
It is possible to save and restore snapshots of the LRIS status using the scripts save_state
and restore_state.
These scripts are run from the lrisserver window.
For a complete description of the options see the
save_state
and
restore_state scripts.
Note:
- The script save_state generates ASCII files which can be
easily edited.
- The snapshot may also include CCD keywords and other
parameters, unlike the XLRIS scripts
- The restore_state script can generate error messages in
case of failures. If it is run with
the -verify flag then
it will actually verify that the new setup has been
applied to LRIS.
- Red CCD parameters ARE NOT included.
- XLRIS setup files
This option has been discontinued.
Both the red and the blue cameras need to
be re-focused daily.
As the observer, you're responsible for determining the nominal
focus of the red and blue cameras using the following procedures.
Remember that if the cameras are not properly focussed, the
telescope focus will be determined incorrectly!
The focusing process might be a little complicated due to the
large number of different focal planes of LRIS, and the confusion
between the instrument focus and the telescope focus. Due to the
way it is designed, LRIS has three main instrument focuses:
- the imaging focus
- the longslit spectroscopy focus, and
- the MOS spectroscopy focus.
Each focus depends on the instrument configuration. The imaging
focus depends critically on the filter. Both the longslit and the
MOS focuses vary with grating/grism, central wavelength, and
possibly the selected order-blocking filter. If your observations
include a combination of imaging and spectroscopy and multiple
configurations, the afternoon focusing procedure can be extremely
time consuming, and needs to be started as soon as possible. On
the other hand, there are two main shortcuts that allow for
shorter focusing procedures:
- Once the imaging focus has been determined for one
configuration, the focus for other filters can be obained using
the focus table. The procedure is described in detail in the
Imaging focus section below
- Once one of the two spectroscopy focus has been measured
(either MOS or long-slit), the focus for the other mode can be
obtained by using the focus table, provided the instrument
configuration is exactly the same (wavelength, grism, grating,
filters)
There are now three different methods for focusing the instrument:
- Imaging mode. This will use the "GOH_LRIS"
mask (a grid of holes) to determine imaging focus. This is only necessary
if you intend to do science imaging during the night. The MIRA telescope
focus process can still determine the secondary tip and tilt even if the
instrument is not focussed for imaging. If the OA runs MIRA focus
without the proper afternoon imaging focus, that is OK. They should just
use the autofoc procedure on the long slit or the MOS mask afterwards
to set the secondary focus (piston) for your spectroscopy observations.
- Long & Multi-slit
mode. Complete this procedure if your program includes
non-polarimetric spectroscopy.
- Spectro-polarimeter mode. Configure the instrument for polarimetry,
then use the same GUI as for Long & Multi-slit mode above.
Note 1:
Large focus variations on both cameras have been observed. Thus, it is
important to focus the instrument each night.
Note 2:
We recommend that observers focus for every configuration and use the
focus table as a backup. Also, please remember that the focus table only
gives approximate values.
Note 3:
The instrument is focused in the afternoon. Therefore, we assume
that this value will be stable throughout the night. We find that
the focus fluctuations during the night are about 30 steps in the
blue and 0.01 in the red which are much less than 0.01arcsec in
fwhm.
Afternoon calibrations are required to determine wavelength
calibration and flatfielding. In spectral mode, these data can be
obained in several ways, as described below.
Automated calibrations
Acquire a spectral calibration sequence automatically with the Slitmask Calibration Tool, which you launch
from the background menu via Background Menu
> LRIS Utilities > Slitmask Calibration Tool.
This tool is rather self-explanatory, and produces flats and
arcs for all your slitmasks. If you run it in the morning, check
the Do end-of-night shutdown box to complete the
instrument shutdown procedure when datataking is completed. Also please inform the OA how long the calibrations will take so that they can comunicate the info to the daycrew. In any event, the observer should aim to have the calibrations completed by 8:30 HST.
Note that you will need to select the appropriate exposure time
for your flats. A table with the currently suggested exposure
times can be found
here .
Manual arc calibrations
If you prefer to take arcs manually, follow this procedure:
- Configure LRIS for spectroscopic observations.
- Close the trapdoor.
- Turn on the desired arclamps.
- Acquire spectra for each longslit or multislit setup.
Manual flatfield calibrations
If you prefer to take flats manually, or if you want to manually
check the proper exposure level:
- Wait for the telescope to be released and in the dome flat
position. If the telescope is released:
- View the K1 Status on the SIAS
Page. If the line is green, the telescope is
released.
- Telescope Elevation = 45° (see FACSUM).
- Dome and Azimuth are 90° apart (see FACSUM).
- If the telescope has not been released and it is after
4:00pm HST, please contact your SA to determine when the
telescope will be available.
- Select K1 Telescope Status Menu -> Dome
Lamp Control GUI and allow
a few seconds for the widget to appear.
- Select ON and then set the power level 0 to put the lamps on high power.
- Configure LRIS as desired and take images.
- WARNING: Please remember to switch off
the lamps when you are done by selecting Quit.
Until the telescope has been released (which typically happens by
4:00 PM), it's not possible to take dome flats. While waiting,
you can take bias and dark frames. Note that the dark current on
the CCDs is quite low, so most observers do not bother with darks.
Also, the LRIS bias is basically featureless, so bias frames are
generally not necessary either. Remember that LRIS is not light
tight. Useful dark calibrations can be taken only of the dome is
completely dark. Check with your SA to determine whether this is
the case.
Observing Assistants customarily arrive at the summit around 5:30pm in winter and 6:00pm in summer.
Once they arrive, you can do one or more of the following:
- Greet the OA.
Introduce yourself to the OA and alert them to any
immediate needs that you will have. Tell them if you are taking
calibrations and inform them about your calibration plans.
- Wait for the OA to get settled.
Setting up computers and bringing up all of the telescope
control systems requires some time, and things go wrong
much more often than we would prefer. Be patient while the
OA prepares the telescope for operation.
- Inform the OA about your starlist.
Now would be a good time to let the OA know where your
starlist is, so they can verify that they have access to it.
- Inform the OA of your plans for the
night
It is always good practice to inform the OA of
your science plans: depending on the LRIS modes you plan to use
(longslit, MOS, imaging), the OA will make decisions on how and
when is best to focus the telescope. The OA can also be asked
about specific observing techniques you are interested into (e.g
dithering, offset pointing, etc). Just before opening, your SA
will also be available to help with these issues. Do not be shy
and ask.
If you are reading this, you're probably very tired and
hungry. Moreover, the real work is still ahead of you. Now it is a
good idea to go get dinner and all other sources of sustainment
you may need during the night.
In each remote ops room there is a folder labelled Restaurant Guide for you to consult.
Please also note that Starbucks (across the road, in the Foodland
food court) closes, mercilessly and irrevocably, at 9:00 pm. But
it opens at 5:00am.