Quick Reference
- If you do not know who is your assigned SA, you
can find the name on the observing schedule posted in
the Remote Ops I or available online.
Home and cell phone numbers are posted on the cork
board behind the monitors of the instrument observing
station.
- You should make sure to discuss the following
points with your SA:
- Plans for afternoon and night calibrations.
- Instrument issues, recent changes and latest news (e.g. focus procedures, recent
problems, setups, etc).
- Telescope issues: in particular devise a plan for
performing telescope nighttime focus procedures (a.k.a. MIRA or Autofoc), which are
optimized for your scientific needs and use of the
instrument.
- Any other questions, requests and needs you may have.
- Consult the on-line
Keck I observing schedule. Find the listing for
today's date (note that the dates are HST, not UT dates).
- The eighth column of the table will indicate the account
you have been assigned. For example, if it reads
MOSFIRE(1), your account is mosfire1. Use
this account name (in lowercase) when logging in to Keck
computers.
Whether observing from Waimea or from a mainland observing site,
MOSFIRE observers run all instrument software within
VNC desktops. Generally, VNC
servers for your run should be up and running when you arrive to
observe.
Please follow the instructions for connecting remotely via the Remote Observing software. This process
is the same whether connecting from the Remote Operations room at Keck HQ
in Waimea or from another remote site.
- Start a browser: From the desktop menu select Firefox
- Click on the link labeled Instrument
Ready? available on the side menu on any page.
- In the upper right of SIAS check the instrument
status. If it reads MOSFIRE
READY on a green background the instrument is ready
for use. If the message is MOSFIRE
NOT READY on a red background, then MOSFIRE has not
been released for your use. If it is after the nominal
release time (2:00pm weekdays, 3:00pm weekends) contact your
SA for assistance.
Note also that if the telescope has
not been released, you will not be able to take dome
calibrations.
To avoid triggering a “fatal error” on the MOSFIRE
slitmask mechanism (CSU), it is critically important to confirm
that MOSFIRE is at an acceptable position angle for moving the CSU
bars. Although the day crew should have left MOSFIRE at the
correct physical rotator position (drive=-90°), it
is wise to verify this as follows:
- If you are not in Waimea, launch the FACSUM window on your
telstatus VNC desktop by right-clicking on the
background menu and selecting
K1 Telescope Status Menu > FACSUM
If you are in Waimea, refer to the FACSUM window displayed on the large wall
display.
- Check the current value of the drive angle
shown on FACSUM.
- Confirm that the value of drive is outside of
the “danger zone” within which CSU moves are likely
to cause fatal errors; this range of angles to avoid is
-10°<drive<10° and
170°<drive<190°.
- If the value of drive is in the CSU danger zone,
then please contact your SA immediately to have MOSFIRE rotated
to an acceptable position for CSU moves.
You now have the choice of maintaining paper or electronic logs
for your observing run.
Electronic logsheets
The Keck Observing Log Archive (KEOLA) maintains an on-line log of
your run which you can access through the browser window to view
or edit. This log is generated whether or not you choose to use
it, and is only accessible from within the Keck network, not from
outside, so if you are observing remotely you must launch a
browser within VNC to access the electronic logs. For full
instructions, please refer to the KEOLA
webpage.
Paper logsheets
If you prefer physical logsheets for note-taking, now would be a
good time to prepare them. You can preview and print out copies
of logsheets from the computer.
- Local observers. If you are in Waimea and will
need logsheets for note-taking, you can print one of several
preformatted logsheets available for MOSFIRE:
- Right-click on the background pane and
select Instrument Utilities > Print
Logsheets to launch the Xlogsheets GUI.
- On the Xlogsheets GUI:
- select your preferred logsheet format
- if desired, click Preview to view the selected logsheet
- select the desired number of copies to print
- click Print to print logsheets to the Remote Ops
printer in Waimea
- Remote observers.
If you are observing remotely, you can download the logsheets from
the MOSFIRE logsheets webpage and print
them to your local printer.
To assist in your logging, you may find it helpful to launch the
obslog window which provides a summary of your MOSFIRE
exposures. From the MOSFIRE background menu, select MOSFIRE
Utilities > Xobslog to launch this window.
Observers wanting to use the multi-slit mode of MOSFIRE will need
to install their mask design files created with the MAGMA tool. MAGMA generates
subdirectories that contains the mask design files. Typically,
observers copy the entire directory tree to the
CSUmasks area in their assigned MOSFIRE observing
account on mosfire (e.g.,
/home/mosfire3/CSUmasks).
Note that the instructions here describe pushing or pulling the mask files to
the machine mosfire.keck.hawaii.edu, this is functionally the
same as doing this to mosfireserver.keck.hawaii.edu because they
share a home directory. We recommend using the mosfire machine
instead of mosfireserver because the latter is a SunOS machine
and may be incompatible with the SSH on your local machine.
To “push” files from your laptop or remote computer to Keck
- Obtain access through the Keck firewall if the computer is
at a remote site.
- Go to the directory with the slitmask files.
- Copy files to your directory at Keck via:
scp -r directory account@mosfire.keck.hawaii.edu:CSUmasks
For example, if your computer has the files in a directory
called mymasks and you have been assigned to use
the mosfire1 account, then type
scp -r mymasks mosfire1@mosfire.keck.hawaii.edu:CSUmasks
To “pull” files from your laptop or remote
computer to Keck
- Open a window on mosfire and type cd
CSUmasks to go to your mask directory.
- Copy files from your remote computer via:
scp -r account@hostname.domain.edu:/path/to/files .
Each mask design directory contains a one-line file called
maskname_StarList.txt which lists the mask
name and coordinates. Observers need to create a
starlist that contains all of these entries. To do so, simply:
- Right click on the desktop to access the MOSFIRE menu.
- Select MOSFIRE Utilities > Generate Mask Starlist
- Enter the name of the starlist file to create, or just
press Enter to accept the default.
- The software should report that it has generated the
starlist file and placed it in your home directory on the
MOSFIRE computer.
If you wish to add targets to your starlist file, please refer to
the Starlist web docs for
formatting specifications. To install your starlist file in the
proper location, simply copy it into your directory in
/kroot/starlists.
- Start up the MOSFIRE software.
- Right click on the background to access the MOSFIRE menu.
- Select MOSFIRE Control Menu.
- Select Start All MOSFIRE
Control.
The script will launch a window and will allow you to specify the
observer names, output directory, starting frame number, etc.
- Verify windows.
Check that the following windows appear:
- On the leftmost screen:
- On the center screen:
- On the right screen:
- Autodisplay (screen shot)
- Mosfire Keventsounds
- Instrument compass rose (tkrose)
- MosfireServerXterm
Verify that you can acquire and display images by taking a test
bias/dark frame.
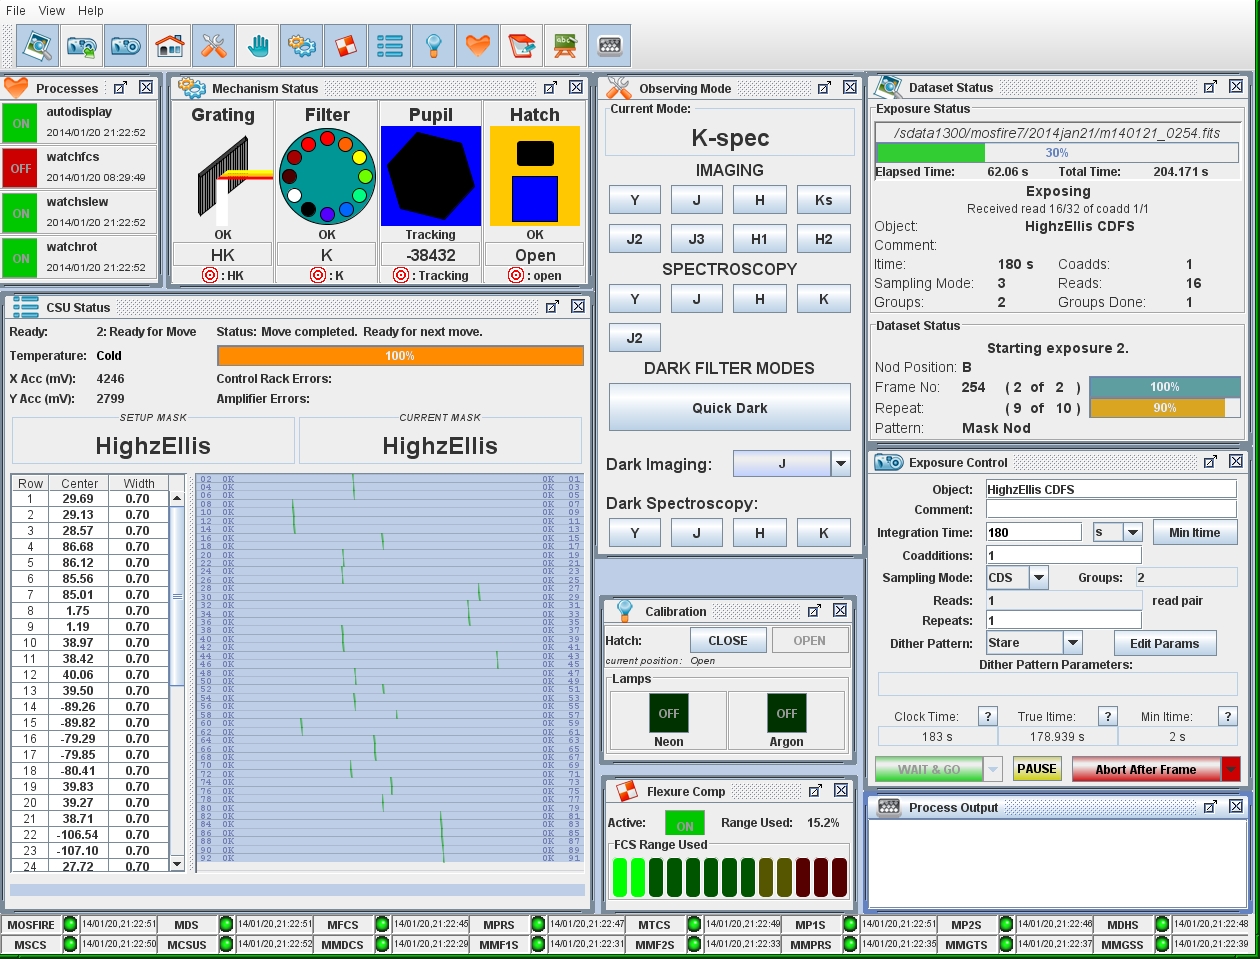
- On the MOSFIRE Desktop Observing Mode GUI (left-hand
screen), click any of the dark mode selectors
(DarkYJ-SPEC, DarkH-SPEC, etc.) to insert
the “dark” filter.
- On the MOSFIRE Desktop Exposure Control GUI (left-hand screen):
- Change Sampling Mode to CDS to select correlated
double sampling readout mode.
- Click the Min time button to select the shortest
possible exposure time.
- In Coadditions, enter 1 to select a
single co-add.
- Click on Wait & Go to trigger image acquisition
- After a few moments, the image should display on the
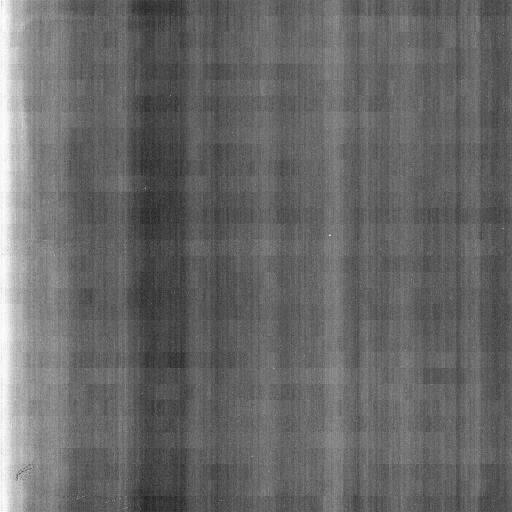
MOSFIRE Autodisplay ds9 Tool (right-hand screen). Inspect the
dark image. Data values should be close to 0 or slightly negative (few tens of counts). Horizontal
banding (indicating slightly different bias levels on the
multiple readout amplifiers) and vertical banding (resulting
from electronic noise) may appear on the image. See sample MOSFIRE bias image.
The bars of the Configurable Slit Unit (CSU) sometimes lose their
calibration and fail to come to the correct position. The best
way to confirm that the CSU bars are positioning correctly is to
form a complete longslit and acquire an image of it to verify that
the bars form a straight line. Proceed as follows:
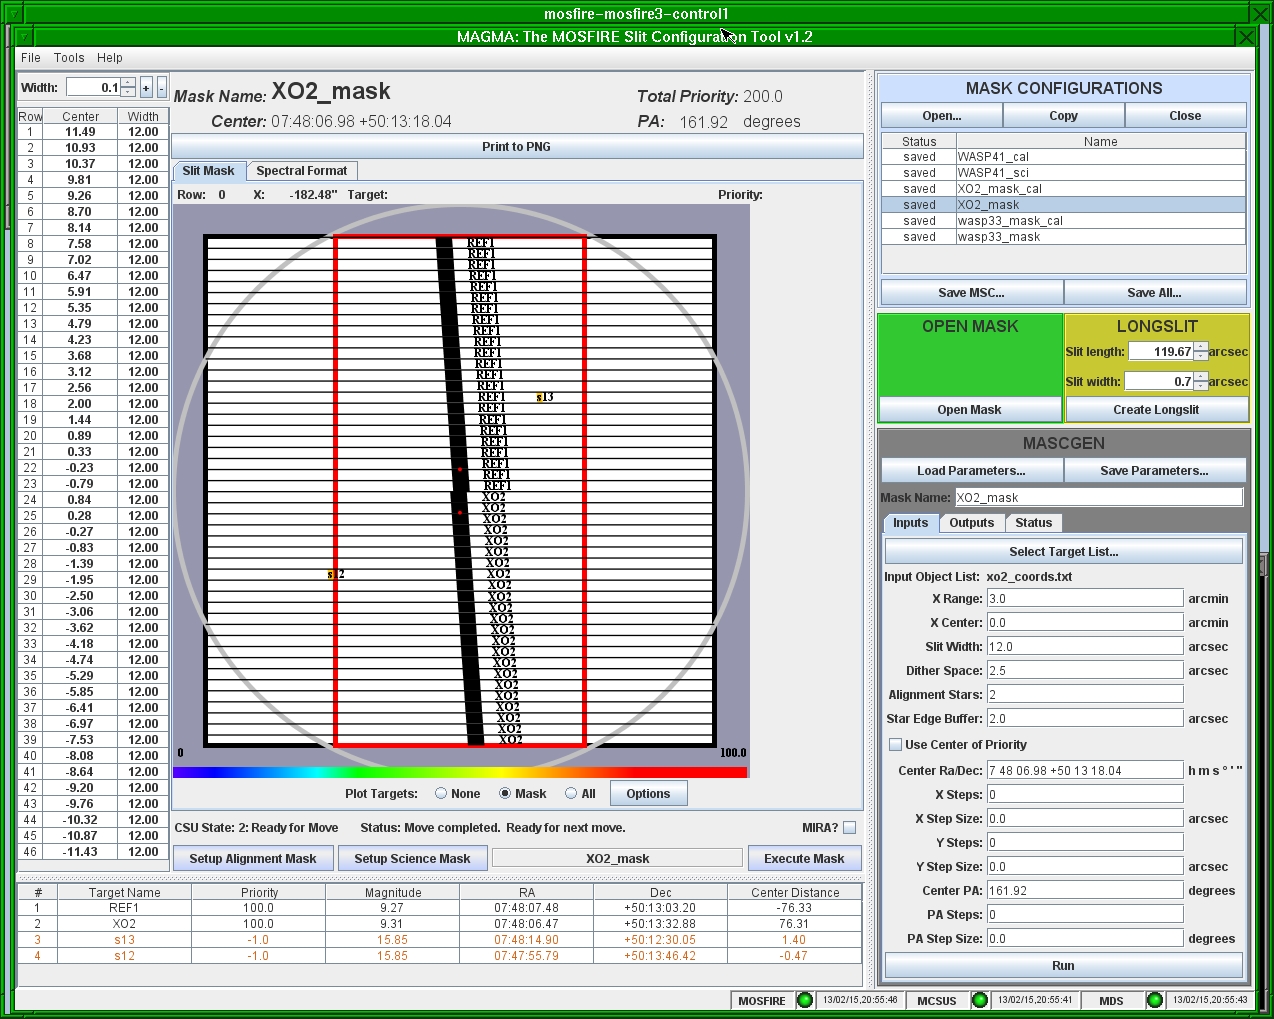
- In the Longslit pane of the MAGMA GUI, increase
the slit length to its maximum value by clicking the up-arrow
button beside the Slit length selector. It should
reach a peak value of 366.988; if not, kill and restart MAGMA.
- In the Longslit pane of the MAGMA GUI, set the
width of the slit to the default of 0.7 by entering that value
in the Slit width entry box.
- Click the Create Longslit button. Confirm that
the resultant longslit covers all 46 segments, and that the mask
name displayed at the top of the gui (and under Mask
Configurations) reads LONGSLIT-46x0.7.
- Check the current CSU configuration on MOSFIRE
Desktop. If it is a longslit mask with similar slit-width, e.g.
LONGSLIT-46x1.0, then set up an extra wide long
slit like LONGSLIT-46x5.0 instead. Making small slit
movements such as from 0.7" to 1.0" (or vice versa) can cause
CSU fatal error and should be avoided.
- Click Setup Science Mask button to download
moves to the CSU controller.
- Click Execute Mask to reconfigure the CSU, which
may take up to five minutes to complete.
- On the MOSFIRE Desktop Observing Mode subpanel, click the
H button in the IMAGING region to
reconfigure for imaging in the H band.
- On the MOSFIRE Desktop Exposure Control, configure for a
short exposure as follows:
- Set Coadditions to 1.
- Set Sampling Mode to CDS.
- Click the Min Time button to request the
minimum exposure time.
- Set Repeats to 1.
- Set Dither Pattern to Stare.
Click the WAIT & GO button to acquire the expoure.
- Inspect the resulting image on the ds9 display. Confirm
that:
- the slit extends from the top to the bottom of the
image;
- the slit is of uniform width;
- the slit edges correspond to the predicted positions
indicated by the green markers
- If the bar positions match the predictions, proceed to the
next step. If not, then contact your support astronomer to
request that any bars which are out of position be re-initialized.
If you'll be observing slitmask fields with MOSFIRE, now is the
time to load your designs into the system.
- In the Mask Configurations pane of the MAGMA GUI,
click on Open... to list the subdirectories in the
CSUmasks directory.
- Double-click on any of the folder icons in the directory
list to open the directory.
- Double-click on the name of the .xml file to
open the mask design file. The GUI will load and display the
mask design.
- Repeat the previous steps for any other masks you would
like to calibrate and observe.
The MOSFIRE flexure compensation system cannot correct for imaging
motion until it knows the position of the telescope and instrument
rotator. These are generally not available until the day crew
initializes the Keck I telescope and releases it to you.
Please check the
SIAS page for updates on the status of the telescope.
This should only be done after the summit
staff or your SA informs you that the telescope is
released, at which time the dome should be dark. The
calibrations use the external dome lamps, so the telescope must
be at the dome flat position to acquire spectroscopic or
imaging flats.
- Confirm Telescope pointing
Confirm that the telescope is configured as follows:
- telescope elevation 67° (note in 2023 this was changed from 45° to 67°)
- telescope and dome azimuths are 90
degrees apart.
Or confirm the telescope pointing with your support astronomer.
- Enable the dust cover:
From the window manager pulldown menu select
MOSFIRE Control Menu -> Enable Dust Cover
- Flexure Compensation System Check
It's important for you to verify that the flexure compensation
system is not near its limit before you start your calibrations by
following these steps:
On the MOSFIRE Desktop (left screen), inspect the
Flexure Comp GUI and check the status of the FCS.
- If only the green bars in the FCS Range Used
region are lit, the FCS is within the safe zone for
calibrations.
- If the yellow or red bars in the FCS Range
Used region are lit, then the system is near the end of
its range; in this case, you must get help to rotate the
instrument into a more advantageous orientation for
calibrations.
- Read the drive angle (physical rotator angle) of
the instrument rotator on the FACSUM
display.
- With the telescope at horizon, FCS will be in the
red zone when the physical drive anlgle is
between -90° and 0°
- Ask your SA to rotate the instrument to the
preferred position of -90° by issuing the command
rotpposn -90
- Spectroscopic Calibrations ...
- Launch Calibration Tool.
From the MAGMA gui, select:
Tools -> Calibration Tool
- Select calibration options.
On the Calibration Tool:
- Under Arcs, select quantity of arcs to
acquire and determine which lamps (Ne and/or Ar) to use.
The default is to acquire 3
arcs with both lamps for each mask in K-band only.
- Under Flats, select flat quantity and exposure
times. Default exposure times
are appropriate for 0.7" slits; re-scale this to your
slit width as appropriate.
- Under Slitmasks, select or de-select masks and
spectral bands (Y,J,H,K) to calibrate.
- Click the GO button to launch the acquisition script.
Approximate Calibration Timing Using Default Settings
| Calibration Event | Time (min) |
| Configure Mask | 7 |
| Y-band | 5 |
| J-band | 4 |
| H-band | 4 |
| K-band | 8 |
The software will then sequence mask setups to acquire the
specified arcs and flats. During this process, the hatch will open
and close as needed to permit dome light to illuminate the
detector. The calibration script will reconfigure the CSU to the
selected mask designs.
- Imaging Calibrations ...
Most infrared observers prefer to construct imaging-mode flats
using dithered on-sky images. However, it is also possible to
construct flatfields in the Y, J, H,
and Ks passbands using the regular dome flatfield lamps
as described below.
- Select filter.
On the MOSFIRE Desktop Observing Mode GUI (left-hand screen),
click the IMAG button for the appropriate passband
to insert the filter and configure for imaging mode.
- Open hatch.
On the MOSFIRE Desktop, locate the Calibration GUI. If it's
not visible, then click the light bulb icon at the top of the
desktop. On the calibration GUI, click the OPEN button
to open the hatch.
- Turn on dome lamps.
In an xterm window on mosfireserver, enter the
following command to turn on the imaging flatfield lamps:
domelamps im
- Configure detector.
On the MOSFIRE Desktop Exposure Control GUI (left-hand screen):
- Change Sampling Mode to CDS to select correlated
double sampling readout mode.
- Set the Integraion Time to the appropriate value
for your imaging filter according to the MOSFIRE Exposure Recipes Table.
- In Coadditions, enter 1 to select a
single co-add.
- Click on Wait & Go to trigger image acquisition
- Check signal.
On the Autodisplay GUI, check the signal level for the test
image. The ideal is to be close to but not exceeding
20,000 DN per coadd, high enough to get good illumination
without entering the non-linear regime of the detector.
- Adjust exposure.
Use the observed count rate to determine what revised exposure
time would give you the desired signal level. On the MOSFIRE
Desktop Exposure Control GUI, enter the revised exposure time
in the Integration Time entry box.
- Acquire data.
On the MOSFIRE Desktop Exposure Control GUI, enter the number
of exposures to obtain in the Repeats box, then click
Wait & Go to acquire the data.
- Turn off dome lamps.
In an xterm window on mosfireserver, enter the
following command to turn off the imaging flatfield lamps:
domelamps off
Observing Assistants customarily arrive at the summit around
5:30pm in winter and 6:00pm in summer. Once they arrive, you can
do one or more of the following:
- Greet the OA.
Introduce yourself to the OA and alert them to any immediate
needs that you will have. Tell them if you are taking
calibrations and inform them about your calibration
plans.
- Wait for the OA to get settled.
Setting up computers and bringing up all of the telescope
control systems requires some time, and things go wrong much
more often than we would prefer. Be patient while the OA
prepares the telescope for operation.
- Inform the OA about your
starlist.
Now would be a good time to let the OA know where your
starlist is, so they can verify that they have access to it.
- Inform the OA of your plans for the
night
It is always good practice to inform the OA of your science
plans: depending on the LRIS modes you plan to use (longslit,
MOS, imaging), the OA will make decisions on how and when is
best to focus the telescope. The OA can also be asked about
specific observing techniques you are interested into (e.g
dithering, offset pointing, etc). Just before opening, your
SA will also be available to help with these issues. Do not be
shy and ask.
If you are reading this, you're probably very tired and
hungry. Moreover, the real work is still ahead of you. Now it is a
good idea to go get dinner and all other sources of sustainment
you may need during the night.
In each Remote Ops room there is a folder labelled Restaurant Guide for you to consult.
Please also note that Starbucks (across the road, in the Foodland
shopping center) closes, mercilessly and irrevocably, at 9:00 pm.
It may stay open until 10:00 pm on Friday/Saturday.
Evening Startup Checklist