Summary
- If you do not know who your assigned SA is, consult the
observing schedule posted in Remote Ops 2 (also available online).
Contact numbers for all SAs are posted on the partition wall.
- You should make sure to discuss the following points with your SA:
- The goals of your observing programs and any unusual
aspects of the observering strategy..
- Plans for afternoon and night calibrations.
- Instrument issues, recent changes and latest news (e.g., recent problems)
- Any other questions, requests and needs you may have.
- Consult the on-line
Keck II observing schedule. Find the listing for
today's date (note that the dates are HST, not UT dates).
- The eighth column of the table will indicate the account
you have been assigned. For example, if it reads
NIRES(1), your account is nires1. Enter
this account name (in lowercase) when logging into Keck
computers. Your SA will supply you with the password for
your account.
Regardless of whether you will observe from Waimea, mainland
observing site, or from home (PJ observing) all of your NIRES software runs within VNC desktops. VNC servers for your
run should be up and running five days prior to your run. Please
follow the appropriate set of steps below to launch your VNC
viewers on the primary and secondary workstations.
Your SA will help you with the
first startup of the system.
Waimea Startup Procedure
- Log in to primary seat.
Log in to Hanauma in Remote Ops II using your
assigned NIRES observing account (e.g., nires1; if
needed, please contact your Support Astronomer to get the
password).
- Launch primary and Secondary VNC desktops.
Once you log in, ask the SA for the best way to start the instrument vnc windows. For this, you will need your
account (nires1 from
above) and the VNC
viewers will be launched automatically.
Remote Observing Site
- Please check with your local site manager for info about how to start uo the VNCs.
At Home Observing (PJ Observing)
- Please follow the instructions for home observing.
About your VNC desktops
You should have four VNC desktops,
two tan and two blue. The tan desktops
are reserved for the IDL quicktools, while the blue desktops are the preferred place to launch
a browser window, the secondary host applications, and the control
GUIs.
You are not permitted to operate NIRES until
the summit staff have completed their checkout procedure!
Please follow these steps to determine when NIRES has been released
for your use:
- Launch the Firefox browser from the desktop menu by
selecting Firefox - NIRES Home Page.
- Click on the link labeled Instrument
Ready? (available on the side menu on any LRIS webpage) to
access the SIAS webpage.
- In the upper right of the SIAS webpage check the instrument
status. If the displayed message reads NIRES NOT READY on a red background, then
NIRES has not been released for your use. If it reads NIRES READY on a green background, then the
instrument is ready for use. If it is past the nominal
instrument release time (2:00pm weekdays or 3:00pm weekends), please
contact your SA for assistance.
Note: you will not be able to take any dome calibrations
until the telescope has been released; this generally
occurs by 4:00pm HST.
- Switch to VNC control
desktops.
On your primary host computer (hanauma in Remote
Ops II), switch to viewing the VNC desktops; these are
used for instrument control.
- Start the NIRES Software.
Select NIRES Control Menu > Start All
Observational Software (Observer). from the vnc desktop menu. An
xterm window will pop up with the following message:
Welcome to the NIRES initialization script.  You should ALWAYS run
this script at the start of any observing nights of your run to
undo any changes that the previous observer made to NIRES and to
re-initialize hardware and software.
The script is self-explanatory.
When finished, the script will print the message:
Instrument initialization completed
and the xterm window will disappear.
- Verify windows.
Check that the following windows appear:
Left screen
(control0 desktop - tan)
|
Center-left screen
(control1 desktop - tan)
|
Center-right screen
(control2 desktop - blue)
|
Right screen
(telstatus desktop - blue)
|
- Slit Viewer Display
- SVC xterm
- NIRES_SLIT_CAMERA_status display
- Compass Rose
- Slit-Nod Widget
|
- Spectral Display
- spectroscopy xterm
- NIRES_H2RG_status
|
|
|
Perform the following actions on your telstatus screen host
machine.
- Check for FACSUM/XMET.
If your team includes remote observers who cannot view FACSUM
and XMET on the gorgeous wall monitors in the Waimea Remote
Ops room, you should verify that they are active. If not then
launch them within VNC session "telstatus":
- Right-click on the background menu and select
Telescope Guis > FACSUM
- Right-click on the background menu and select
Telescope Guis > XMET
- Launch MAGIQ Guider Interface.
- Right-click on the background menu and select MAGIQ Guider UI
Program Identification GUI (PIG)
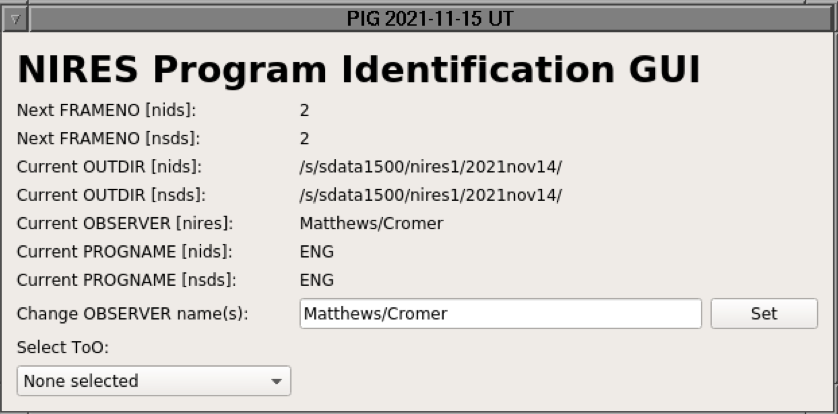 |
The PIG will choose default observer names which are based on
the telescope observing schedule. To change these defaults, click
in the observer name box and type the name(s) as you wish them to
appear in FITS headers of your data. Then click "set". Note the
data directory which gets assigned, and cannot be changed by the
observer.
If it is a split (i.e., shared) NIRES night, then the
first half observer directory will be named as the UTDate,
and the second half directory will be the UTDate with "_B" appended.
On split NIRES nights, clicking on one of the listed program names will
make it the active program, which toggles to the appropriate
directory where subsequent data will be saved to,
with file numbers that either start at 1 or
continue sequentially after the last file number written to that
directory.
GUIs
 |  |
Take test images to verify that they are reading
out properly. Ths instrument is operated from command lines or by
using the exposure control GUIs. NIRES
does not handle very well (aborting exposures) so verify the
exposure settings (e.g., exposure time, coadds) before taking
images.
|
Command Line
|
GUI
|
Test Spectroscopy
- On the "Spectroscopy xterm" window type
gois to
write test image to disk or
tests to just take an image.
- Verify the image displays in the Quicklook "Spectroscopy Display."
Test SVC
- On the "SVC xterm" window type
goiv to
write test image to disk or
testv to just take an image.
- Verify the image displays in the Quicklook "Slit Viewer Display."
|
Test Spectroscopy
- On the NIRES_SPEC_CONTROL GUI set an exposure time of 2 seconds, 1 coadd, and 1 read
and press "CONFIGURE."
- Press "SINGLE EXPOSURE" or "TEST."
- Verify the image displays in the Quicklook "Spectroscopy Display."
Test SVC
- On the NIRES_SCAM_CONTROL GUI set an exposure time of 2 seconds, 1 coadd, and 1 read
and press CONFIGURE.
- Press "SINGLE EXPOSURE" or "TEST."
- Verify the image displays in the Quicklook "Slit Viewer Display."
|
Arcs can be taken by using a set of Neon lamps on the dome. Most
reduction procedures make use of the sky lines for wavelength
calibrations and the arcs can be used as a sanity check. The arc
images can be identified because the obstype is domearc
The dome lamps can also be used to take flats. These flats are
mostly used to trace the illuminated regions on the science
detector. The flat
images can be identified because the obstype is domeflat
Nires does not have a hatch, cover, or shutter. It does not have
moving parts so it does not have a blank filter either. Therefore,
darks can not be taken. However, it is possible to take flatsoff
that can be of use. The flatsoff
images can be identified because the obstype is dark
The following is the procedure for taking the dome calibrations.
- Wait for the telescope to be released and in the dome flat
position. If the telescope is released:
- View the K2 Status on the SIAS
Page. If the line is green, the telescope is
released.
- Telescope Elevation = 45° (see FACSUM).
- Dome and Azimuth are 90° apart (see FACSUM).
- If the telescope has not been released and it is after
4:00pm HST, please contact your SA to determine when the
telescope will be available.
Using the SPEC GUI
- The observer can use the NIRES SPEC CONTROL GUI to run the dome calibrations (flats and arcs).
- Select the CALS tab on the GUI
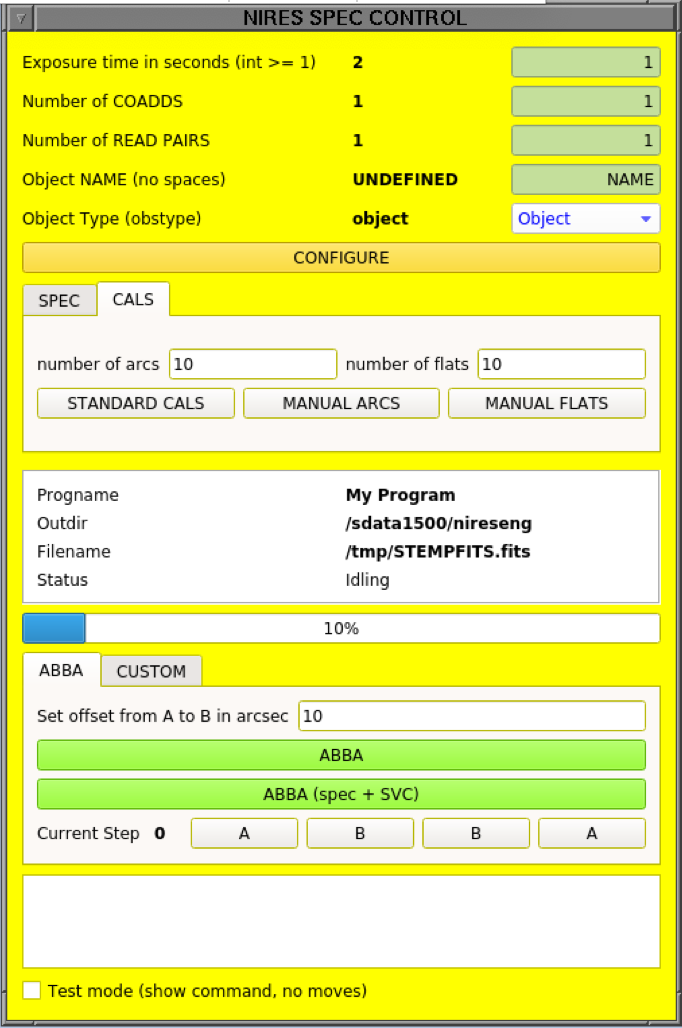
- The observer can change the number of arcs and flats by entering them on the boxes
- The observer can select from three options. Note that the obstype is changed accordingly:
- STANDARD CALS. This option would run the arcs and flats as specified in the webpage (100 seconds for flats and 120 seconds for arcs).
- MANUAL ARCS. This option will obtained the selected number of frames with the exposure times, number of reads, and coadds as defined in the GUI.
- MANUAL FLATS. This option will obtained the selected number of frames with the exposure times, number of reads, and coadds as defined in the GUI.
Using Command Line Scripts
- On the "Spectroscopy xterm" window type
goflats [n]
where n is the number of flats to
take. The script will take n flats with exposure time of
100 seconds. The detector settings are set automatically to CDS (i.e., the script executes the following commands: "sampmodes 3", "nsamps 2", and "coadds 1").
- Verify the image displays in the Quicklook "Spectroscopy Display."
- On the "Spectroscopy xterm" window type
goarcs [n]
where n is the number of Ne arcs to
take. The script will take n dome arcs with exposure time of
120 seconds. The detector settings are set automatically to CDS (i.e., the script executes the following commands: "sampmodes 3", "nsamps 2", and "coadds 1").
- Verify the image displays in the Quicklook "Spectroscopy Display."
If the observer would like to take flats with dome lamps on and
off then the goflatonoff [n]
script can be used. This script works like the goflats with the exception
that it takes an additional flat with dome lamps off after each
flat.
If the observer would like to take calibrations with different
settings (i.e., exptime, coadds and/or number of reads) then the lamps
would need to be turned on manually and the observations would
have to be taken with the command line.
On the "Spectroscopy xterm" window type
domelamps spec
to turn the dome flats on and
domelamps off
to turn them off.
On the "Spectroscopy xterm" window type
niresarcs on
to turn the dome arcs on and
niresarcs off
to turn them off.
Until the telescope has been released (which typically happens by
4:00 PM), it's not possible to take dome cals. While waiting,
you can take dark frames. Note that the instrument does not have
a hatch or cover door. Therefore, the darks are really flats of
the telescope IR background.
Observing Assistants customarily arrive at the summit around 5:30pm in winter and 6:00pm in summer.
Once they arrive, you can do one or more of the following:
- Greet the OA.
Introduce yourself to the OA and alert them to any
immediate needs that you will have. Tell them if you are taking
calibrations and inform them about your calibration plans.
- Wait for the OA to get settled.
Setting up computers and bringing up all of the telescope
control systems requires some time, and things go wrong
much more often than we would prefer. Be patient while the
OA prepares the telescope for operation.
- Inform the OA about your starlist.
Now would be a good time to let the OA know where your
starlist is, so they can verify that they have access to it.
- Inform the OA of your plans for the
night
It is always good practice to inform the OA of
your science plans: depending on the LRIS modes you plan to use
(longslit, MOS, imaging), the OA will make decisions on how and
when is best to focus the telescope. The OA can also be asked
about specific observing techniques you are interested into (e.g
dithering, offset pointing, etc). Just before opening, your SA
will also be available to help with these issues. Do not be shy
and ask.
If you are reading this, you're probably very tired and
hungry. Moreover, the real work is still ahead of you. Now it is a
good idea to go get dinner and all other sources of sustainment
you may need during the night.
In each remote ops room there is a folder labelled Restaurant Guide for you to consult.
Please also note that Starbucks (across the road, in the Foodland
food court) closes, mercilessly and irrevocably, at 8:30pm (except
Fridays at 9:30pm and Saturdays at 10:00pm). But keep in mind that
they open everyday at 4:30am!.