
The units for offsetting the telescope are arcseconds on the sky. The following approximation is sufficient for arcminute moves:
The telescope should be focused to NIRSPEC at the start of each night. If there is a large temperature change as the night proceeds, we recommend doing a additional telescope focus later in the same night.
NIRSPEC has an internal rotator to derotate the sky. It is controlled via the Rotator GUI.
The Rotator GUI shows the current state of the mechanism. There are 3 panels left to right: The left panel shows the physical position of the rotator mechanism, with limits denoted in red. The center panel shows the position angle on sky for SCAM and the right panel shows the position angle on sky for the Slit. The rotator MODE is selected by a pull down menu located below the right panel. Physical angle or Slit PA angle destinations are entered into the boxes below the selected mode.
For objects brighter than about 13th magnitude, targets will be aquired on SCAM and aligned to the slit. Guiding with SCAM is not yet available, but the object will be clearly visible in the SCAM field with the slit. Ask the OA to acquire and guide on the annular guider.
This procedure will generally take less than a minute plus slew time.
For objects between 13th and 17th magnitude, ask the OA to acquire and guide on the annular guider. The SCAM guider will be under observer control for fine acquisition and verifying proper guiding.
This procedure will take about 5 minutes plus slew time.
For objects dimmer than about 18th magnitude, acquisition is more involved. We suggest you find an offset star within about 1 arcminute of your target and determine the offsets in arcseconds east and north. We will acquire the offset star, then offset the telescope to the science target.
This procedure will take about 10 minutes plus slew time.
Note: You may wish to go back to the offset star after a single ABBA nod sequence to verify it is still in the slit.
You may use the abort button on the EFS to abort an observing script that is in progress. Doing this will allow the current exposure to finish (which is strongly recommended). After the current exposure reads out, you will need to re-acquire the target to the slit center again. If you are worried about excessive counts on SCAM from the current exposure in progress, you may move the star off the slit while you are waiting for the exposure to end.
.SPEC: 1.5 seconds, sampmode=CDS
| Sampmode | # Read Pairs | Exp. Time Range (sec) |
|---|---|---|
| CDS | 1 | 1.5 - 2.9 |
| MCDS | 2 | 3.0 - 4.4 |
| MCDS | 3 | 4.5 - 5.9 |
| MCDS | 4 | 6.0 - 60 |
| MCDS | 16 | 61 and longer |
NOTE: expsoures when commanded from the EFS will automatically set readout parameters according to this table.
SCAM: 0.67 seconds, sampmode=CDS
SPEC: 25,000 DN per coadd
SCAM: 15,000 DN per coadd
1% non-linearity in CDS or MCDS mode. We have NOT seen evidence for persistence on the new SPEC or SCAM detectors
A test of a 900 sec dark frame with SPEC that immediatetly followed an image of an arc lamp frame that showed strongly saturated lines exhibited NO evidence of persistance. SCAM images of bright targets are regularly saturated during acquisition, but also do not show persistance afterward.
The Thin blocker is a thin piece of PK50 glass used to block thermal emission. The NIRSPEC-N custom filters have small leaks in the thermal IR, so the Thin blocker is used to block this emission. However, in some filters (e.g. NIRSPEC-1), the thin blocker does add fringing at the ~50 adu level. Some observers may opt to select "Open" instead of "Thin" when configuring for their setup up to avoid this fringing, at the expense of elevated background in some (~1/3 of the orders) on the detector. In General:
| Detector | Pixel Scale (arcsec / pixel) |
|---|---|
| SPEC (high-res) | 0.129 (spatial axis); 0.096 (spectral axis) |
| SPEC (low-res) | 0.096 (spatial axis); 0.129 (spectral axis) |
| SCAM | 0.158 |
| NIRSPECM (annular) | 0.210 |
N.B. these are approximate values as calculated by the EFS.
| Low Resolution | |||
|---|---|---|---|
| Filter | Grating Order | Dispersion (μm/pix) | Coverage per 2048 pix (μm) |
| N-1,N-2 | 4 | 1.4062e-4 | 0.288 |
| N-3,N-4,N-5 | 3 | 1.8749e-4 | 0.384 |
| N-6,N-7 | 2 | 2.8126e-4 | 0.576 |
| KL,M-wide | 1 | 5.6249e-4 | 1.152 |
The high resolution wavelength dispersion for NIRSPEC is a linear
function of wavelength:
Dispersion [μm/pix] = λ [μm] × 0.96436e-5
| High Resolution | |||
|---|---|---|---|
| Filter | Mean λ (μm) | Dispersion (μm/pix) | Coverage per 2048 pix, single order (μm) |
| N-1 | 0.95270 | 0.9186e-5 | 0.0188 |
| N-2 | 1.19050 | 1.1483e-5 | 0.0235 |
| N-3 | 1.24909 | 1.2048e-5 | 0.0247 |
| N-5 | 1.58733 | 1.5317e-5 | 0.0313 |
| N-7 | 2.17687 | 2.0995e-5 | 0.0429 |
| KL | 3.04954 | 2.9393e-5 | 0.0601 |
| M-wide | 4.76205 | 4.5932e-5 | 0.0941 |
The nominal slit center on SCAM is at pixel (120,95).
The nominal slit center on NIRSPECM (annular) is at pixel (521,517).
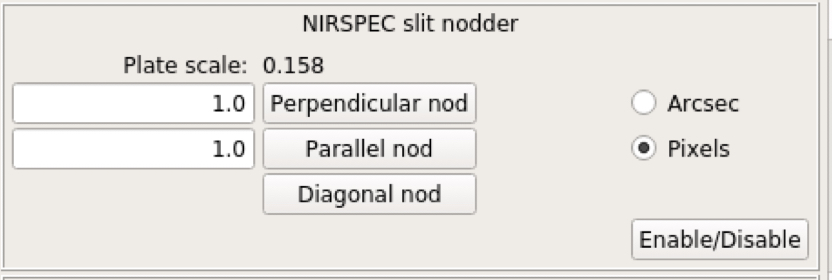
With either method, repeat the above steps as needed, or use the NIRSPEC slit nodder (just below the offset picker) to make fine alignment adjustments. When ready, ask the OA to "mark base" and set the "SCOR".
Objects brighter than 13th mag should be visible in the shortest SCAM expoasure (0.65 sec)
Maximum exposure times depend on the sky level which can vary during the night.
Generally, to get about 3000-4000 counts (single coadd) on SCAM of sky background:
Note, sky background levels for SCAM are reduced by a factor of 10-12 when NIRSPEC is behind AO
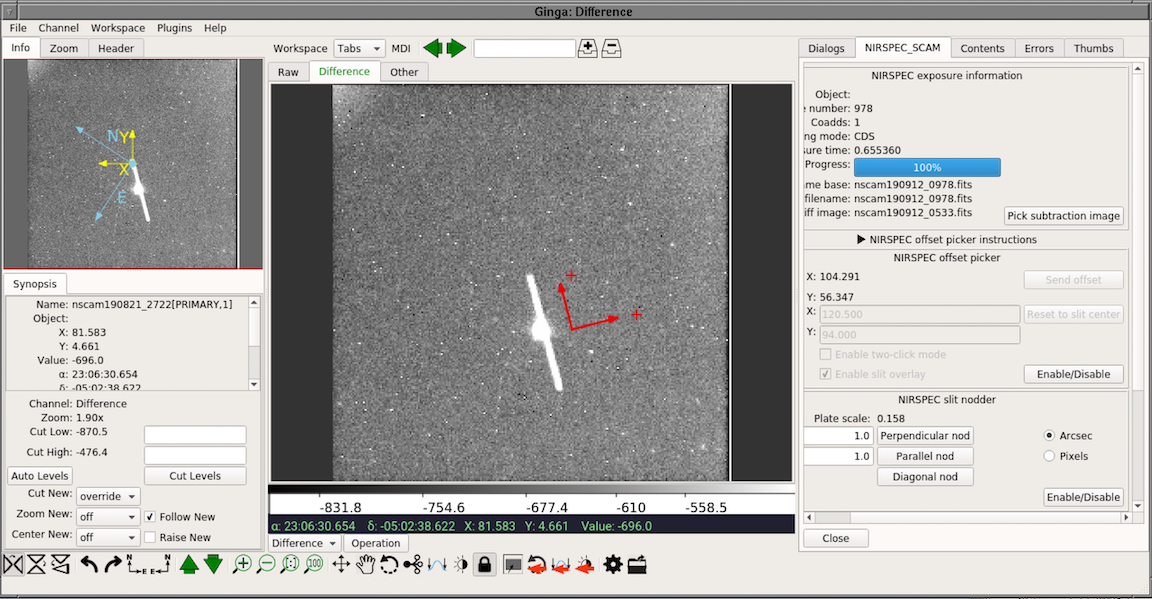
Take a difference of two displaced images:
From any nirspec xterm (local xterm on VNC), type "snapi".
The following will happen:The SCAM Ginga tool shows RAW and DIFFERENCED frames with every new SCAM exposure. Subsequent SCAM exposures will always show a difference subtracted image when the "Difference" tab is selected.
There are many considerations for SPEC exposure times so if you are unsure, please read through all of these points:
Sky brightness (between OH lines) guidelines (N.B. The sky levels change during the night and from night to night. ):
Note: Background levels are reduced for SPEC by a factor of 10-12 when NIRSPEC is behind AO.
Each image taken is automatically displayed in the RAW tab of the Ginga SPEC GUI. To view a subtracted AB nod pair:
Depending on whether NIRSPEC is behind the AO system or not, and on what filter and blocker combination is used, echelle spectra may exhibit an underlying sinusoidal ripple. The effect is particularly pronounced in AO mode, where the slow, almost parallel beam (f/160) induces a Fabry-Perot pattern as it encounters the dewar window.
In non-AO mode, interference occurs between the NIRSPEC order sorting filters and their associated blockers near the pupil plane. This effect can be almost completely removed with the application of a fourier domain filter, such as hanning. In non-AO mode, the fringing effect is usually less than a few percent. This may be reduced by taking out the long wavelength blocker, i.e. Select "Open" instead of "Thin" below the filter choice in Setup Mode on the EFS GUI and click "Go" to apply this configuration change. This procedure has been commonly used when observing with the NIRSPEC1 filter. Note that care should be taken to characterize the impact of the red leak if the blocker is out. Check See details here for more details.
The differential rates required by the telescope are different that those most common (such as from JPL Horizons).
Horizons gives you dRA*cos(DEC) and d(DEC)/dt in arcseconds per hour. At Keck, you must divide the RA rate by 15 into the psuedo-unit of seconds per hour.
Note also that the values of dra and ddec as reported by DCS are per second, that is the values reported by DCS are the values from your starlist divided by 3600.
| Guide On | Position Angle mode | Stationary mode |
|---|---|---|
| Target | Click "On Target" DOFFGE=0 |
Click "On Target" DOFFGE=0 |
| Field Star | Click "On Star" DOFFGE=1 |
Set SCOR AND Click "On Star" DOFFGE=1 |
After completing the Invisible object acquisition is outlined here, you want to start your science exposures.
NOTE: Especially when observing extremely faint (invisible) objects, one must consider his or her data reduction plan before observing. Spectra on NIRSPEC are tilted with respect to rows and coloumns on the SPEC detector. If your object has no continuum, you must correct for this tilt in another way.
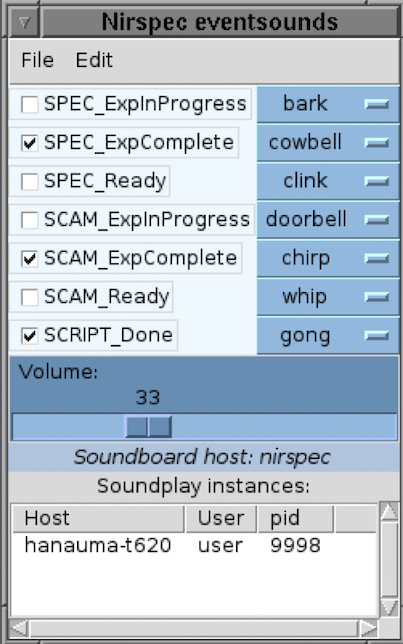
NIRSPEC has the following default sounds which are checked in the Eventsounds GUI. These sounds may be customized or disabled completely from the GUI, as desired.
You should take at least a single set of arcs and flats BEFORE you change the settings of either of the two Gratings or the Slit wheel.
A useful observing pattern is: setup 1, object, cal star, arcs, setup 2, object, cal star, arcs, etc.
Another option is: setup 1, object, arcs, setup 2, object, arcs, etc. then repeat the sequence for the Cal star.
Maybe. Spectral shifts of up to +/- 2 pixels (which is less than before the upgrade) may occur because of vibration from image rotator when observing in slit P.A. mode or slewing to a new rotator angle. Night sky OH lines inherent to the spectra may be used for internal calibration if there is a discrepancy with the observed arc lamp lines.
Alternatively, rotator stationary can safeguard against any potential movement of the echelle grating by eliminating image rotator motion and hence image rotator vibration.
The Cal star is needed to sample and remove (by division) the telluric features imparted by the Earth's Atmosphere. The best Cal star is one with no (or very weak) intrinsic spectral features. Isolated features can be interpolated. A0V stars are generally preferred; though O-type stars can be helpful in the H-band where A-stars do have some intrinsic stellar lines. It is best to keep the airmass difference at 0.1 or less.
The Calibrations page describes how to take calibrations using either the the EFS or the CAT.
The EFS will give you minimum cals needed to calibrate your data: Configure EFS in Setup Only mode, then select obs mode = "Lamps Only" and click "Go".
The CAT gives you more flexibility in number of flats and lamps off frames.
If you wish to get pure dark frames (i.e. with a cold blank in beam), please follow this procedure:
Please see the News Page for more details.
NIRSPAO throughput is lower by a factor of 5 to 10 in spectroscopic mode and 3 to 4 in imaging mode.
Each pixel is about 10.6 times smaller in AO mode:
| NIRSPEC AO slits | |||
|---|---|---|---|
| Slit Width (") | Slit Length (") | Resolving Power | Resolution Mode (High or Low) |
| 0.013 | 1.13 | 50,000 | High |
| 0.027 | 1.13 | 37,500 | High |
| 0.041 | 1.13 | 25,000 | High |
| 0.054 | 1.13 | 18,500 | High |
| 0.068 | 1.13 | 15,000 | High |
| 0.027 | 2.26 | 37,500 | High |
| 0.041 | 2.26 | 25,000 | High | 0.068 | 2.26 | 15,000 | High | 0.038 | 3.96 | 2500 | Low | 0.054 | 3.96 | 1670 | Low | 0.072 | 3.96 | 1250 | Low |
All filters are available in AO mode. See the specifications page or filters page for details.
You do not use the internal NIRSPEC rotator with AO and so you do not need to bring up the Rotator GUI. Instead, you will set the AO rotator via the command line:
The SLITPA and SCAMPA fits header info is now correct for NIRSPAO.
SLITPA = position angle of slit to the top (+y) or left (+x) in Ginga SCAM display
SCAMPA = position pointing toward positive y in Ginga SCAM display
The observer indicates the wavelength of the science observation before starting the AO exposure.
Also known as the "LUI", this displays the loop status, the laser state, and the guide star counts/Rmag.
Note that when the MAGIQ ObserverUI is launched, you will be viewing the ACAM guider rather than the usual NIRSPEC annular guider.
The ACAM field of view is 2 x 2 arcmin. The pixel scale is 0.125 arcsec/pix. There is a vertically offset ghost reflection in the camera optics--the upper one is real.
The CAT takes care of setting the calibration lamp intensity for AO calibrations as well. Use the CAT as you would in non-AO mode by just putting in the number desired lamps off and on. For arclamps, we reccomend using the coadds=20 and itime=1.5sec.
You should prepare a starlist that has appropriate non-sidereal rates, as you would for non-AO NIRSPEC observations. The AO system can lock onto your non-sidereal target and keep it centered at a given position
Please do not load non-AO scripts into the EFS or run non-AO scripts from the command line. This will affect the position of the AO pupil stop and you will lose valuable observing time.