The NIRC2 status GUI is a non-interactive graphical user
interface to show the current detector setup, exposure progress,
motor selection, and additional observation settings such as program
ID, output data directory, and coordination of the NIRC2 exposures
with the AO system. The status GUI can be started from the VNC
background menu by selecting NIRC2 Control →
Interface Subcomponents... → Start NIRC2 Status GUI.
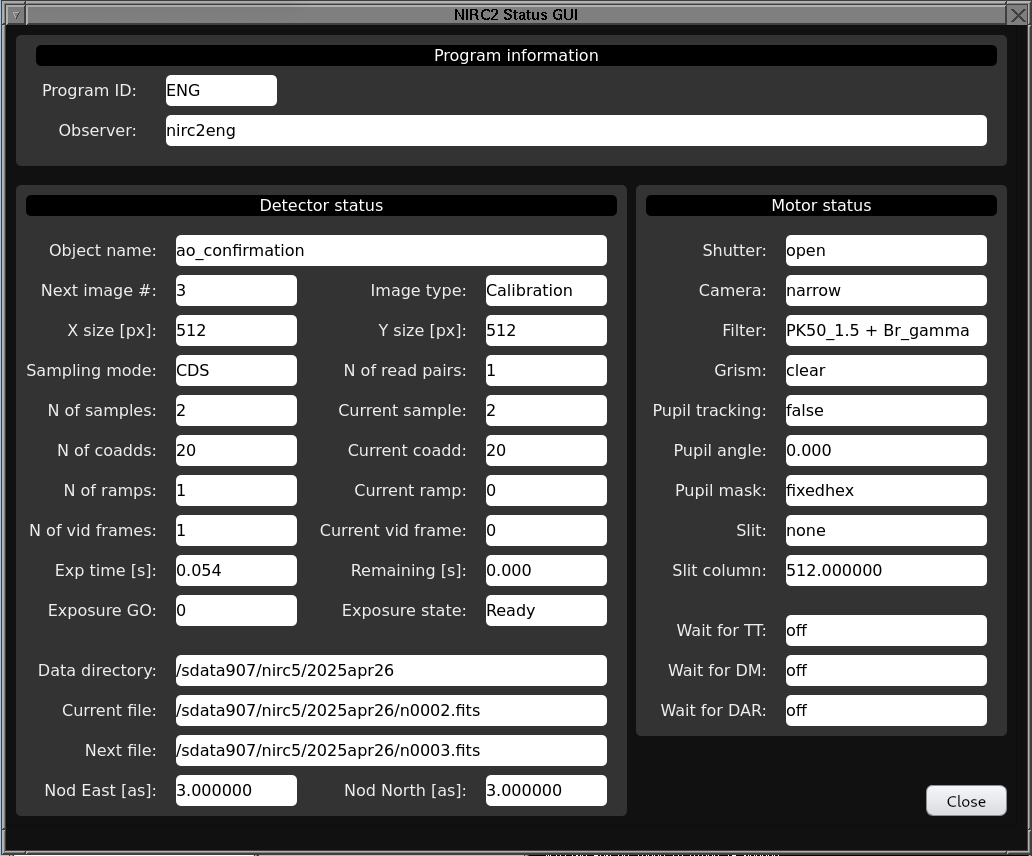
The following figure shows the layout of the status GUI:
NIRC2 status GUI
It is important to keep in mind that NIRC2 detector and internal
stages are controlled by typing commands on any waikoko-new
terminal. The NIRC2 status GUI cannot be used to control the
instrument, but you can get the following tooltips.
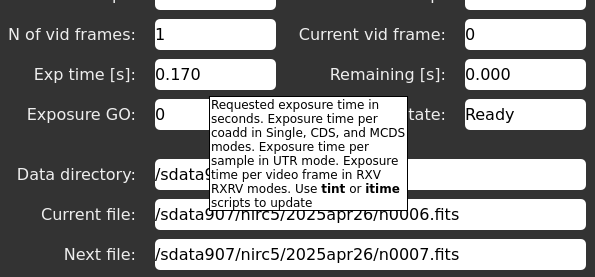
Hoover mouse over any of the white boxes to display then name of
the command that needs to be typed on the terminal to change
parameter shown in the box. The following example shows the
tooltip indicating that you can use the commands itime
or tint to change the exposure time.
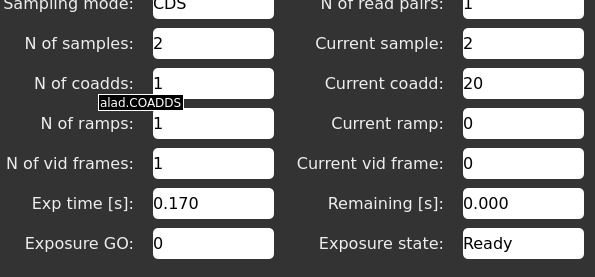
Hoover the mouse over the text with white fonts and gray
background to display the name of the KTL (Keck Task Library)
keyword corresponding to the field to the right of the text. The
following example shows the tooltip indicating that the keyword
COADD from the KTL alad dispatcher
represents the number of coadditions in an exposure.
The control GUI is composed of the following areas:
This area of the GUI is used to show the program ID and the list of
observers. It is important to set the program ID correctly
using the Program Identification GUI
(PIG) because this information is used by Keck Observatory
Archive (KOA) to determine who is the owner of the images. The
program ID can be found on the
telescope schedule.
Setting the program ID in PIG Also
sets the correct output directory and the next available image
number to be saved in the data directory.
Program ID, list of observers, output data directory, and next
available image number can also be defined using the following set
of command line scripts on a waikoko-new terminals, but
using the PIG to set this
parameters is a preferred method.
Program ID: progname E503 (Program ID found in the telescope
schedule.)
List of observers: progname
Observer1,Observer2,Observer3 (Comma-separated list of
observers.)
Output data directory: runname
/sdata907/nirc1/2025apr29 (Data directory for the user
account and current UTC date.)
Next available image number: frame 127 (Next
available frame number.)
If you type any of the commands above without any value next to it,
the corresponding script will show the current value for the
associated parameter.
This area of the GUI shows the following fields that have to do with
the detector configuration and ongoing exposure progress:
Object name: Name of the object currently being
observed.
Next image #: Next image number to be saved on disk.
Image type: Type of image, such
as Dark, FlatLamp, or Object.
X size [px]: Size of detector subarray in the X
direction.
Y size [px]: Size of detector subarray in the Y
direction.
Sampling mode: Sampling mode such
as CDS, MCDS, or UTR
N of read pairs: Number of read pairs in MCDS mode. Note
that the number of read pairs is automatically set to 2 in CDS
mode.
N of samples: Number of samples. The number of samples
will automatically be set to twice the number of read pairs in
CDS and MCDS modes. It can also be set independently to the
number of samples up the ramp in UTR mode.
Current sample: This value is automatically updated
during an ongoing exposure to show the current sample within the
total number of samples.
N of coadds: Number of coadditions in CDS and MCDS
modes.
Current coadd: This value is automatically updated
during an ongoing exposure to show the current coaddition
within the total number of coadds.
N of ramps: Number of ramps in UTR mode. Note that this
value is different than the number of samples up the ramp. One
can for instance define 3 ramps, each of them with 100 samples
up each ramp.
Current ramp: This value is automatically updated during
an ongoing exposure to show the current ramp within the total
number of ramps.
N of vid frames: Number of video frames in video sampling
mode NOT IMPLEMENTED
Current vid frame: This value is automatically updated
during an ongoing exposure to show the curren video frame within
the total number of frames.
Exp time [s]: Exposure time per coadd in CDS and MCDS
mode. This value also represents the exposure time per sample in
UTR mode.
Remaning [s]: Remaining exposure time in the current
exposure.
Exposure GO: State of the current exposure. Its value
is 1 when the exposure starts and 0 when
the exposure ends.
Exposure state: State of the current exposure. Its value
is Start when the exposure starts
and Ready when the exposure ends.
Data directory: Directory where images are being saved.
Current file: Current file name including full path.
Next file: Next fule name including full path.
Nod East [as]: Predefined East telescope offset in
arcseconds. This is typically used with the tosky
and fromsky scripts.
Nod North [as]: Predefined North telescope offset in
arcseconds. This is typically used with the tosky
and fromsky scripts.
This area of the GUI shows the different elements inserted in the
NIRC2 optical path and the status of keywords used to coordinate
NIRC2 exposures, telescope moves, and AO system loops:
Shutter: NIRC2 shutter position.
Camera: Selected camera.
Filter: Selected filter combination.
Grism: Selected grism.
Pupil tracking: State of the NIRC2 pupil tracking. This
is normally true for rotating pupil masks
and false for non-rotating pupil masks.
Pupil angle: Angle of the rotating pupil mask. These
value will change over time when a rotating pupil mask is
selected and pupil tracking is true
Pupil mask: Selected pupil mask.
Slit: Selected position in the slit slider stage. This
includes slits of different widths for spectroscopy, Lyot
coronagraphic spots, and vortex coronagraphic masks.
Slit column: Approximate detector colum where the slit,
or coronagraphic masks are located.
Wait for TT: If turned on, then wait for the
AO tip-tilt loop to be closed before a new exposure starts.
Wait for DM: If turned on, then wait for the
AO DM loop to be closed before a new exposure starts.
Wait for DAR: If turned on, then wait for the
AO DAR correction to be adjusted before a new exposure starts.