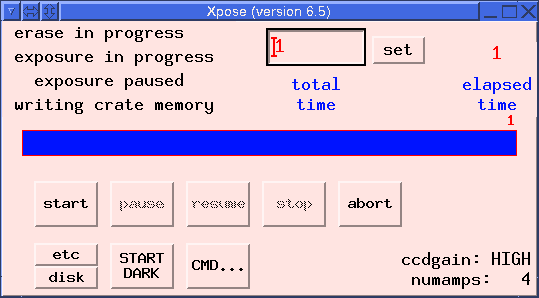
Introduction
The Xpose GUI on the red and blue side is used to start exposures, set
binning, and set the number of amplifiers for readout. There are
two Xpose GUIs: a red side Xpose located in the center display
and a blue side Xpsoe located in the rightmost display. Both
Xpose GUIs are displayed on startup. Below you will find
descriptions of the actions and information buttons available
with the Xpose GUIs. Some buttons display sub windows that
accept user input. The subwindows are also described
below. Actions or information that are specific to the
Red or
Blue side
are highlighted.
Red side Xpose Widget.
Blue side Xpose Widget.
To set the exposure time:
- Double click on the red text above
the blue label that says ``total time.''
- Type in a new number (in seconds) and press the
SET button.
Notes:
The SET button must be clicked to set the desired exposure. Updating the text does not automtically reset the exposure time.
You can change the exposure time of the current
exposure while it is in progress.
Changing the exposure time will update the exposure
status bar. Note that the
exposure time must be an integer value, with a
1-second minimum (except in dark mode, in
which zero seconds is a valid exposure time).
Action Buttons |
Button |
Function |
START |
Star an exposure |
|
PAUSE |
Suspend the current exposure. Close the shutter until further action is taken. |
RESUME |
Continue a previously paused exposure. Open the shutter. |
STOP |
Immediately stop an exposure and readout the data |
ABORT |
Immediately close the shutter and discard the current image. |
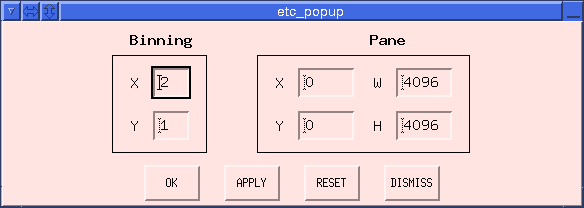
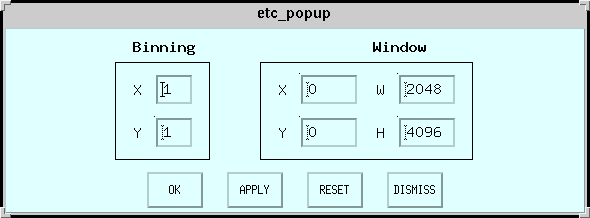
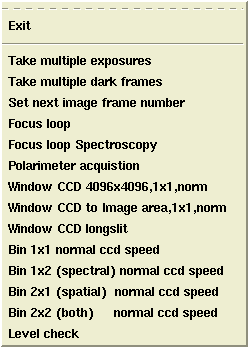
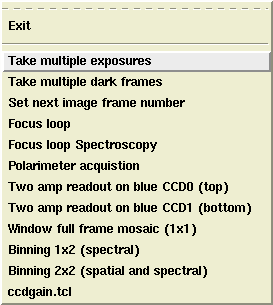
etc |
Opens a sub-window to change the CCD readout window and binning |
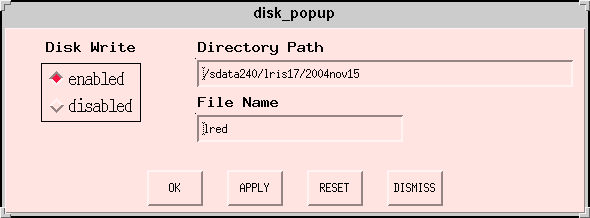
disk |
opens a sub-window to access disk write functions
|
START DARK |
Start an exposure without opening the shutter |
CMD ... |
opens menu from which LRIS scripts are started |
SET |
sets the exposure time to the number in the box at left |
Exposure Informational Items
The following items on the Xpose convey additional
information about the state of the exposure:
- Erase in Progress
- This message will turn red after the
Start button is pressed, to indicate that the
detector is being flushed prior to the exposure.
When active the text color is red.
- Exposure in Progress
- This message will turn red while the
shutter is open and the detector is exposing.
When active the text color is red.
- Exposure Paused
- This message will turn red after you have
paused an exposure using the Pause key.
When active the text color is red.
- Write Crate Memory
- This message will turn red while the detector is
reading out.
When active the text color is red.
- Warning: Disk write disabled
- This message appears when you have disabled saving
of images to disk. Restore writing to disk by using the
DISK... subwidget.
- Warning: Image will be dark
- This message appears when you have set the detector
in dark mode, meanign that the shutter will
be closed during the exposure. Dark mode is turned
off once the current dark exposure (or series of
exposures) is complete.
- Elapsed Time
- Displays the number of seconds currently remaining
on the current exposure.
- Elapsed Time status bar
- A blue bar increases in length during integration to provide a visual
update of the exposures status. The target time for the exposure is printed
at the right edge of the bar. If the exposure time is updated, the bar status
is updated to reflect the change. If the exposure time is updated when an
exposure is not currently in progress, the bar updates using the elapsed time
from the previous exposure.
Subwidgets
Three additional widgets can be activated from the
Xpose widget:
The etc... subwidget allows manipulation of the CCD readout
window and binning. The blue side may not be windowed, unless
the readout is for a single chip. To bin data on the blue side, "Two amp readout"
on the left or right must first be selected. If you try to sub_window the blue side
or you try binning without setting "Two amp readout," the blue
side crate will be lost after the first readout and will require rebooting.
Red Side |
Blue Side |
|
|
|
- Binning menu: Enter the desired on-chip
binning factors in
the column and row directions into the boxes labeled
X and Y, respectively.
- Pane menu: Please see Windowing methods
for instruction on how to properly window the red and blue data.
Enter the column and row
offset of the readout window into the boxes labeled
X and Y, respectively. Entering
values of zero will begin reading out from the first
column or row.
Enter
the number of columns and rows in the resulting image
into the boxes labeled
W (width) and H (height),
respectively. For Blue side data only, when operated without binning (binning
factor of 1) the maximum value for each is
2048. If the binning factor is N, then the
maximum value is reduced to 2048/N.
- Press OK to apply your
changes and dismiss the subwidget.
- Press APPLY to apply your
changes and retain the subwidget.
- Press RESET to return
all binning/winsowing values to their default setting
and retain the subwidget.
- Press DISMISS to exit the
subwidget without applying any changes.
The DISK... subwidget permits changes to the output directory,
the output image prefix, and the disk write status:
Red Side |
Blue Side |
|
|
|
- Allow images to be written to disk by clicking the box
for Disk Write: enabled.
Select the Disk Write:
disabled option to cause the image to be written
as backup.fits in the outggput directory.
- Modify the output directory by editing the text string
in the box labeled Directory Path.
- Modify the output image prefix by editing the text string
in the box labeled File Name. This is set by
default to lris, yielding images named
lris0001.fits, etc.
- Press OK to apply your
changes and dismiss the subwidget.
- Press APPLY to apply your
changes and retain the subwidget.
- Press RESET to return
all binning/winsowing values to their default setting
and retain the subwidget.
- Press DISMISS to exit the
subwidget without applying any changes.
The CMD... subwidget allows the observer to run
certain LRIS macros. The macros available under the red and
blue sides are not identical.
Red Side |
Blue Side |
|
|
|
- Take multiple exposures
Pops up a menu which allows the observer to enter the
number of images to be taken, using the current LRIS
settings and the current exposure time from Xpose.
Red Side |
Blue Side |
|
|
|
- Take multiple dark frames
Pops up a menu which allows the observer to enter the
number of dark images to be taken, using the current LRIS
settings and the current exposure time from Xpose. These
images are taken without opening the shutter.
Red Side |
Blue Side |
|
|
|
- Set next image frame number
Pops up a window allowing the observer to enter the
image number for the next image.
Red Side |
Blue Side |
|
|
|
- Focus Loop
Runs LRIS red or blue
through a series of focus settings, taking exposures at
each step so that the best instrument focus position can be
determined.
Red Side |
Blue Side |
|
|
|
- Focus Loop Spectroscopy
Runs LRIS red or blue
through a series of focus settings, taking exposures at
each step so that the best instrument focus position can be
determined.
Red Side |
Blue Side |
|
|
|
- Polarimeter acquisition
Takes a series of polarimeter images.
Red Side |
Blue Side |
|
|
|
- Window CCD 4096x4096 1x1 norm (red side)
Window full frame mosaic (1x1) (blue side)
Resets the CCD readout window to be the entire chip and
the readout mode to unbinned (1x1 binning).
- Window to image area 1x1 norm
Resets the RED CCD readout window to be the chip area
illuminated by FOV of the imaging area. For Red side only.
- Window CCD longslit (1x1)
Resets the CCD readout window to be the chip area
illuminated by the standard LRIS long slits, using the
longslit script. Red side only.
- Two amp readout on blue CCD0 (left)
Readout only the left CCD. Used when binning. Blue side only.
- Two amp readout on blue CCD1 (right)
Readout only the right CCD. Used when binning. Reset by selecting "Window Full Frame mosaic 1x1" on the blue side. Blue side only.
- Binning 1x1 normal ccd speed
Reset binning to 1x1 for normal science mode data. Red side only.
- Binning 1x2 (spectral) normal ccd speed Red and Binning 2x2 (spatial and spectral) Blue.
Reset binning to 1x2 for normal science mode data. Bins in
the spectral direction.
- Binning 2x1 (spatial) normal ccd speed
Set binning to 2x1 for normal science mode data. Bins in
the spatial direction. Red side only.
- Binning 2x2 (both) normal ccd speedRed and Binning 2x2 (spatial and spectral) Blue. Reset binning to 2x2 for normal science mode data. Bins
both spatially and spectrally.
- Level Check
Check levels without reading a full frame.
Red side only.
- Exit
Select this option to dismiss the CMD...
subwidget.
Quitting Xpose
One normally does not shut down the Xpose widget by itself; it
is generally killed when the Shut Down LRIS Control
option is selected from the LRIS Control Menu
pulldown menu. It could probably be killed by using the
window manager's ``kill window'' function, available by
clicking the button at the top left of the Xpose window.