
| |
Chopper Tutorial | |
A "chopper" is a mechanism which allows a secondary mirror to be rapidly tilted back and forth. Note that it is not the secondary itself. Thus a single chopping mechanism could be used with different secondary mirrors. The Keck "IFSM" (for "Infrared Fast Steering Mirror") has both an f/40 secondary mirror and an f/25 secondary mirror which can be attached to it.
As the mechanism tilts, the images move on the science detector. This provides a way to rapidly center a target on the detector, then switch to a nearby part of sky, then back and forth, back and forth. In a sense, then, it is a faster way of accomplishing the same thing that offsetting the telescope does. The advantage of the chopper here is that the change can be made quickly, at rates faster than 1 Hz and typically 510 Hz. In contrast a telescope move may take 5 seconds before the telescope positioning is stable enough to restart data taking. Hence the telescope speed is closer to 0.2 Hz.

Fig. 1. The chopper.
Why do we need such fast changes in the image position? Particularly in the mid-IR, or thermal infrared, the background radiation changes on time scales faster than a second. Hence offsetting the telescope is simply not fast enough to assure accurate background subtraction. Another possible use is to decrease the overhead involved in moving the image to different parts of the detector.
Think of it in these terms; the huge, massive telescope is much harder to move quickly and accurately than is the relatively lighter secondary mirror.
What tells the chopper to move the secondary? This is called the trigger, and can be a command from a command line, or a signal from an instrument. Generally the trigger is provided as a square-wave signal from an instrument such as NIRC or LWS. Trigger modes will be described further below.
Note that in the Keck I computer room, in the Instrument Interconnect Rack there is a Chopper Monitor Box which controls which instrument controls the chopper. Currently NIRC and LWS are the only two instruments that use the f/25 chopper. On Keck II the f/40 chopper is only used at Right Bent Cassegrain, the visitor's port, and rather than a selection it has jumper cables which connect the signal from the RBC2 Interconnect Panel to the Secondary Panel.

Fig. 2. An example of a trigger signal that would use "chptrig = level" mode.
There are a number of chopping parameters that are especially relevant to observing, such as the chop amplitude or "throw" (i.e. how far the image will move on the detector), the angle (in which direction the chopper will move; the image of the star on the detector will move opposite to this direction), and the frequency (how often the secondary will move from one position to the next). A summary of the most relevant ones is given at the end. Some less obvious parameters include the acceleration of the chopper, the location of the images with respect to the chopper's "rest" position, etc.
Each chopping mechanism has its own limitations. Central to using the chopper are its maximum throw, its maximum frequency at a given throw, and its acceleration. The acceleration is important because it determines, for a given throw and frequency, how long it takes for the secondary to get from one position to the next. This then determines part of the overhead in chopping; one cannot take data during this time period, without ending up with blurred images.
Keyword |
Description |
|---|---|
| chpamp = z | Set the amplitude of the chopper's throw to z arcsec. |
| chpang = z | Set the angle of the chopper's throw to z°. This angle is defined relative to the coordinate system chosen by the chprelto keyword. |
| chpoff = z | Sets the distance, z, in arcsec, from the chopper's "rest" position to the first chop position. When chpstyle = automatic, this is automatically set to half the current value of chpamp. |
| chpon = [0, 1] | Turns chopping on (1) or off (0). |
| chppos = z | If chptrig is in "soft" mode, chppos selects
either the first (chppos=0) or second (chppos=1) chop
position. If chptrig is in "softedge" mode, setting chppos to anything other than zero will cause the chopper to change positions. |
| chprelto = text | Defines the coordinate system in which the angle (chpang) is interpreted: see "Coordinate systems" above. |
| chpstyle = [automatic, manual] | Set to "automatic," provides two chop positions symetrically
placed with respect to the chopper's "rest" position. Set to "manual," allows the user to specify an offset (see chppos above) from the first chop position to the rest position, allowing for asymmetrical chop throws. Typically chppos = 0 is used, so that the first chop position coincides with the rest position. |
| chptrig = [level, edge, off, soft, softedge] | Selects the type of signal that will trigger a chop. See "Trigger modes" below. The usual mode is "level." |
| nodset = [a, b, off] | Used with other offset keywords such as (raoff, decoff), (azoff, eloff), and (instxoff, instyoff), defines one of three nod positions. |
| nodtel = [a, b, off] | Moves the telescope to one of three defined nod positions (see nodset above). The guide box does not move when nodtel is used to offset the telescope. |
When you move a large mass (like the secondary mirror), it becomes difficult to stop it. The Keck choppers have intelligent software that calculates the correct form of acceleration as a function of time that will get the secondary to its destination in the minimum amount of time. It does this by empirically measuring the errors when it does a simple move from one point to the next. It then uses those errors on its next move, creates some additional, smaller corrections, incorporates those into the next move, etc. Quickly it converges to an optimized move, for those particular chop parameters. For different chop parameters (longer throw, faster frequency), the error correction will be different, and it will have to "relearn" its curve.
This behavior of the Keck choppers means that early in a chop cycle the chopping will be inaccurate. It will improve after a few seconds. Most instruments deal with this by sending out the chop signal continuously once the parameters have been defined. MIRLIN is an example of an instrument that simply throws away the first frames, and makes a concerted effort to keep the chop frequency and throw constant throughout observing.
The chopper keyword "chptrig" determines how the chop signal is received. If the value is "level" (the default), it looks for a square wave, and triggers a move whenever the level of the signal changes. If the value is "edge" it looks for spikes in the signal, and triggers off each spike. (The spikes need to be between 0.5 and 5 msec to work properly.)
There are other ways of controlling the secondary position. In particular, if chptrig is set to "softlevel," then setting the accompanying keyword "chppos" to either 0 or 1 will move the chopper to the first or second chopper position. This is a good way of finding out which position corresponds to the high or low level of the square wave.
Chptrig can also have the value "softedge," in which the act of setting a new, nonzero value of the keyword chppos will trigger a chopper move.
If chptrig is "off" it means that the chopper is chopping under its own internal signal, and is not being driven by any instrument.
In general the chopper is used in its simplest mode, where it moves between two positions. We have control over the two positions using the keyword "chpstyle," which can take on two values: "automatic" and "manual." In "automatic" mode, the chop positions are symetrically placed on either side of the chopper's rest position. This has the unfortunate consequence that the OA cannot set up guiding on a star before chopping is turned on; once chopping is going there will be no image at the rest position!
The "manual" style allows more control and is the style generally used by instrument software. It activates the keyword "chpoff," which defines the distance from the first chop position to the rest position. (Actually "automatic" uses this keyword, too, it just automatically sets the value to half the chop amplitude as defined by chpamp.) The default is 0, putting the first chop position on top of the rest position, making it easy to guide. Simply set up on the guide star before chopping is started!
More sophisticated use of the "manual" style includes such scenarios as using a large chop throw to get to sky away from an extended object, but requiring the chop to remain within the bounds of the chopper's capabilities.
The chopper position can also be changed by setting new values of up to six other keywords: chpazoff, chpeloff, chpraoff, chpdcoff, chpixoff, chpiyoff. Generally the base position of the chopper is defined to provide zero coma at field center, and this is done by setting values of chpazoff and chpeloff, the base positions in (az,el) coordinates. The other four keywords are not used in setting the zero coma position.
Normally moving the telescope is used to change the positions of objects on the detector, but conceivably changing the base offset can accomplish the same thing, with less overhead but increased coma and possibly poorer background subtraction. So far this capability has not been implemented or even tested for any instruments.
The chopper keyword "chprelto" defines the coordinate system for several other parameters, in particular the chop angle. The value of chprelto can take on the following values:
| "chprelto" value | Coordinate system |
| rotator | Instrument; 0° is vertical on the detector. |
| posang | Sky; 0° is North on the sky. |
| fixed | Rotator; 0° will be along the 0° p.a. of the rotator itself (hence will rotate in sky coordinates). |
| vertical | Vertical angle; 0° will be perpendicular to the horizon. |
Probably the most common usages for chopping will be "rotator" and "posang".
As mentioned above, chopping allows the detector to see two different parts of the sky in rapid succession. Unfortunately, the detector also sees the primary mirror and parts of the telescope structure differently in the two chop beams. Especially in the thermal infrared, this creates different background shapes in each chop position. To compensate for this, observers will often take a second chopped image with the telescope pointing at some other position in the sky. This allows them to measure the background shape (sometimes called the "radiative offset") and then subtract that from the first chopped pair.
For more efficiency, rather than observe a target-sky pair in the first image, and a sky-sky pair in the second, there are other techniques. Two in particular are used at Keck. An analysis of the signal-to-noise ratio (S/N) of each technique is available, and shows that while each technique has advantages and disadvantages, to first order they produce the same S/N.
In quad chopping, used with NIRC and MIRLIN predominantly, sometimes with OSCIR, rather than move completely off to sky, the telescope is moved slightly off to the side, so that the target is still in the image. Generally the chop throw is such that both chop beams are also on the image. The telescope offset is often equal to the chop throw, and the angle 90° from the chop. This gives four target images in the four frames, all in different parts of the image.
What we call chop-nod at Keck involves setting the telescope offset (or "nod") to the reverse of the chop throw (i.e. same distance, angle 180° from chop angle). If we call the two chop positions "A" and "B," and put the science target at the detector center in chop beam "A" for the first exposure, the nodded exposure should put the target at detector center in chop beam "B" in the second, nodded exposure.
An important feature of chop-nod observing is that guiding is done on the same position on the guide camera for both nod positions. As with the target star, any guide star in the second nod position, chop beam "B" will be in the same position as it was in the first nod position, chop beam "A." Hence the DCS must know not to move the guide box when the telescope is nodded. This is accomplished by defining two positions using the nodset keyword (there are three possible positions: "a", "b," and "off") and setting the nodtel keyword to the appropriate named position:
modify -s dcs raoff = 5 decoff = 7.5 nodset = a
modify -s dcs raoff = -5 decoff = -7.5 nodset = b
These commands define the "a" and "b" positions using RA and Dec. offsets in arcsec. The "off" position is defined as raoff = 0 decoff = 0. To move to position "a":
modify -s dcs nodtel = a
To move to position "off":
modify -s dcs nodtel = off
One very important facet should be stressed: when using nodtel, the guide box does not change positions! It assumes that in one nod position you will have one end of the chop "dogbone" in the guide box, and at the other nod position the other end of the dogbone will be in the guide box. Clearly there is nothing guaranteeing that this is the case.
The figure below illustrates quad chopping and chop-nod. Squares represent the detector, "A" and "B" represent the two chop positions, and the two nod positions are shown at left and right, respectively. In chop-nod (above the horizontal line) note how the star in chop beam A, nod position 1 is at exactly the same position on the detector as chop beam B, nod position 2. In quad chopping (below the line) the four star images fall on four different parts of the detector.

Fig. 3. A comparison of two different techniques: chop-nod (top) and quad chopping (bottom).
What are the responsibilities of the OAs, and what are the responsibilities of the observers? In almost every case, the OA has two responsibilities: (a) making sure that the chopper is initialized at the beginning of the night, and (b) checking to make sure that the observer has not input unrealistic chopping parameters. In some cases, especially with visitor instruments such as MIRLIN, the instrument software does not send enough information to the chopper control, hence the observers will have to request that the OA set some parameters (throw, amplitude, and angle, typically).
The rationale behind letting the observer control the chopper is twofold. First, the chopper frequency is often determined from the instrument parameters, such as the number of coadds, the frame integration time, etc. Taken together, these instrument parameters define the required chopper frequency. Since most instrument software can readily talk to the DCS software, it is easy to pass on this required chop frequency from the instrument software.
Secondly, and more importantly, some observers may have rather complex chopping requirements, and they may need to change their chopping parameters often as conditions change. Because of the large number of chopper keywords and the rather specific "jargon" used with those keywords, observers would not only have to learn what to ask the OA for, but would also have to learn what the proper "buzzwords" are. The exact form of chopping required by a given science program is therfore best left to the observer.
The OA should still keep an eye out for the health of the chopper, however. There is a tool to make this easier, called "chpdisp." Seen below for the IFSM, it graphically shows the chopper's range of capability (yellow circle), the currently set chop parameters (green represents an azimuth base offsetusing the chpazoff keyword, and the red arrow is the chop throw and direction), and compass roses. Note the red arrow representing the chop throw. The first chop position is located at the base of this arrow, the second position at its tip. If guiding must be started after chopping has been turned on, this will help determine which end of the dogbone is the proper end to guide upon.
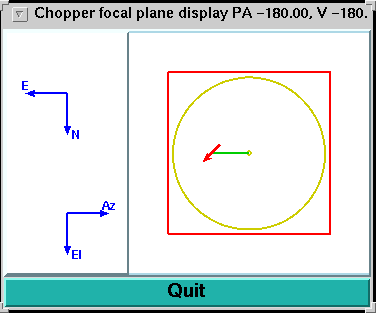
Fig. 4. The chpdisp tool for monitoring chopper parameters.
In general the chopper is controlled from the instrument side of things, as described in "Responsibilities" above.
The chopping mode of the Keck I f/25 secondary is used with NIRC generally only for 35 micron observing (i.e. the thermal infrared, where background radiation is very high and variable). The OA initializes the chopper as part of the overall secondary initialization, but from that point on the observer controls chopping. The one exception is that for chop-nod applications, in which the guide box does not move when the telescope nods, the OA must start guiding on the correct end of the chop "dogbone"; the position which has a star image for both nod positions. We recommend that the OA start guiding on a guide star before the observers start chopping.
LWS uses chopnod regularly. Again, we recommend that the OA begin guiding before the chopper is turned on. The use of LWS is still being shaken out, but we anticipate that it will be used much the same as NIRC; the observer will generally run the chopper.
MIRLIN is a visiting mid-IR instrument which uses the Keck II f/40 chopping secondary. It does not directly support "chop-nod" as defined above. The MIRLIN software has a number of other peculiarities: (a) it does not send a trigger signal continuously, allowing the chopper a chance to settle down after a change in parameters, (b) it does not send chop parameters such as the amplitude, angle, and frequency directly to the DCS, although there are UNIX command scripts that will do so. To get around (a) the observers try to keep the same chop parameters for large parts of the night, and occassionally are forced to throw out the first frame or two of data on an object. The latter is solved either by asking the OA to set chop parameters, or by using the UNIX scripts.
Like MIRLIN, OSCIR is a visiting mid-IR instrument at the f/40 port of Keck II. Unlike MIRLIN it does support chop-nod mode, and does send out a trigger signal well before data-taking begins. This allows the chopper to settle in to whatever new parameters may have been specified.
Like NIRC and LWS, OSCIR is mostly a "hands-off" operation for the OAs, as the observers will control most of the chopping parameters.
Bob Goodrich
Last modified: 12 November 1998.