These are some of the strategies that can be followed if the AO
loops become unstable, for instance in bad seeing conditions.
Step by step troubleshooting guideline:
Try opening and closing loops
Try 1% smaller leak factor, e.g. 0.96 if it was 0.97
Reduce LO gain by a few percent, e.g. 0.36 from 0.40
Reduce HO gain by 1%, e.g. 0.15 from 0.16
If TT residuals are high, increase the TT gain up to a maximum
of 0.45
If the correction is still bad, then return to the original
values.
It is also possible to decrease the number of modes, but it is
recommendable to consider this option as the last resource, and
generally keep the value at 300 or above.
If one factor seems to make a big difference, e.g. HO gain, it is
advisable to go back and restore the other parameters to the
default values.
Additional tips and tricks:
For occasional instabilities one can try to open/close the
loops without changing the loop parameters to see if the
instabilities go away.
If the DM becomes saturated, it may not respond to changes in
the loop gains or number of modes. In this situation the
recommendation is to open the loops, change the loop
parameters, and reclose them.
If the DM becomes saturated, making the integrator leak
smaller may help. Small changes in the integration leak value
have significant impact in the loop stability. If the default
value is 0.96 it is recommendable to keep the leak value
between 0.94 and 0.98.
It is not necessary, bu it is good practice to open and close
the loops briefly after changing the loop parameters,
especially when the reason to make the cnages is to make the
loops stable.
There are different ways to move the PyWFS dichroic in and out of
the optical path:
To move the dichroic out of the optical path, on any account
with access to AO keywords: m obdbnmdm=home
or m obdb=0. Check that the position after the
move is ∼0 mm.
To insert the dichroic in the optical path, open a terminal
as pwfs at vm-pwfsserver, and
type prtcInsertDichroic. Check that the position
after the move is ∼220 mm.
The PyWFS dichroic can aslo be controlled using
the DFB stage on the SC GUI.
prtc@prtcserver:~$ cd KPIC2/DM
prtc@prtcserver:~/KPIC2/DM$ python3
Python 3.6.6 |Anaconda, Inc.| (default, Jun 28 2018, 17:14:51)
[GCC 7.2.0] on linux
Type "help", "copyright", "credits" or "license" for more information.
>>> from DM import DM as dmlib
WARNING: AstropyDeprecationWarning: astropy.utils.compat.funcsigs is now deprecated - use inspect instead [astropy.utils.compat.funcsigs]
>>> DM = dmlib()
>>> flat = DM.setFlatSurf('nirc2')
Other useful functions of the KPIC DM library are:
Launch the Keck II calib GUI from
the k2aoserver-new VNC pulldown menu and
run Calibration setup for NIRC2 and NGS-AO.
Launch the PyWFS calib GUI. On a vm-pwfsserver
terminal as user pwfs,
type prtcCalibrationMenu.py.
Press Calibration setup to launch the PyWFS
calibration setup GUI.
Select DICHROIC and press Optics setup. Wait
until the status is Done.
Press Init PyWFS camera. Wait until the status
is Done.
Press PyWFS setup. Wait until the status
is Done.
Launch the PyWFS modulator control GUI. On
a vm-pwfsserver terminal as user pwfs,
type prtcModulator.py.
Center the modulator if it is not already centered. On any
terminal with access to AO keywords, type modify -s
pmoffx=0.5 pmoffy=0.5
Launch the PyWFS loop display GUI. On
a prtcserver terminal as user prtc,
type loopDisp.py. Check that the four pupils are
evenly illuminated. If they are not, then the FSM
on-axis position needs to be adjusted.
Launch the PyWFS Status GUI. On a vm-pwfsserver
terminal as user pwfs, type prtcStatusGui.py
To modify the on-axis position of FSM1, select FSM1 →
More.
To modify the on-axis position of FSM2, select FSM2 →
More.
Move FSM1 and FSM2 until the four pupil images in the PyWFS
loop display GUI are evenly illuminated.
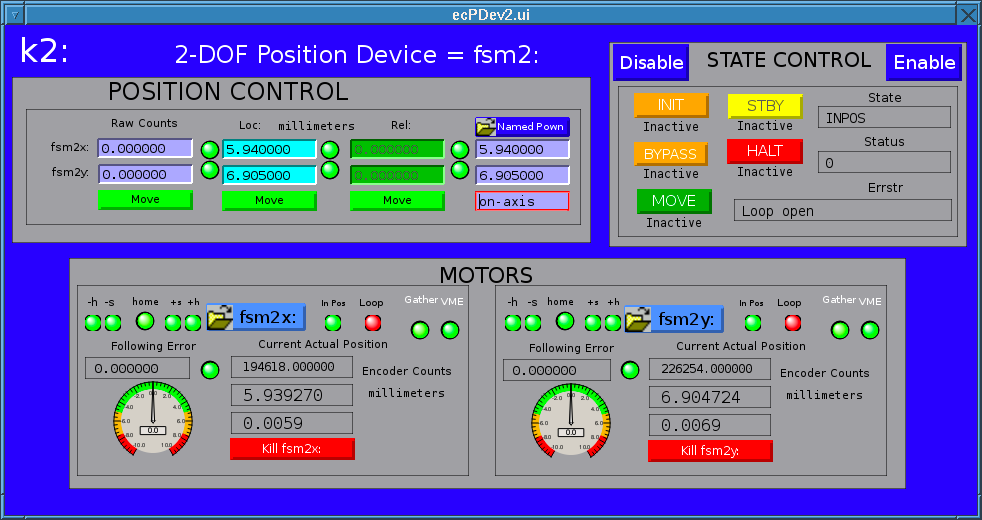
You can move the FSM using the ecPDev2.ui GUIs for FSM1 and
FSM2, or you can move the FSM using keywords.
Move FSM2 (same procedure FSM1) using keywords. On any
terminal that has access to AO keywords, type:
pmcf2x=5.954 pmcf2y=6.808
modify -s ao pmcf2gl=1
Move FSM2 (same procedure FSM1) using the ecPDev2.ui
GUI.
PyWFS FSM2 device control
GUI
Input the desired fsm2x value in the cyan
background box (Loc: millimeters) and hit
Enter (otherwise it will not take the new value).
Input the desired fsm2y value in the cyan
background box (Loc: millimeters) and hit
Enter (otherwise it will not take the new value).
Press Move (under the cyan boxes) to send the
FSM moves. Monitor the PyWFS pupil illumination in
the PyWFS loop display GUI.
Once you are happy wih the pupil illumination (four pupils evenly
illuminated) after having moved FSM1 and FSM2, click on
the Named Posn button on the ecPDev2.ui GUI for
FSM2 (same procedure for FSM1). This brings up
the ecNps2.ui GUI.
PyWFS FSM2 named position definition
widget
Input the new fsm2x on-axis position on the left box
of the control area (red background and white fonts)
and hit Enter.
Input the new fsm2y on-axis position on the right box
of the control area (red background and white fonts)
and hit Enter.
Click on the Define button.
Run the PyWFS Calibration setup again to double check that
all pupils are evenly illuminated once the calibration setup
procedure is completed.
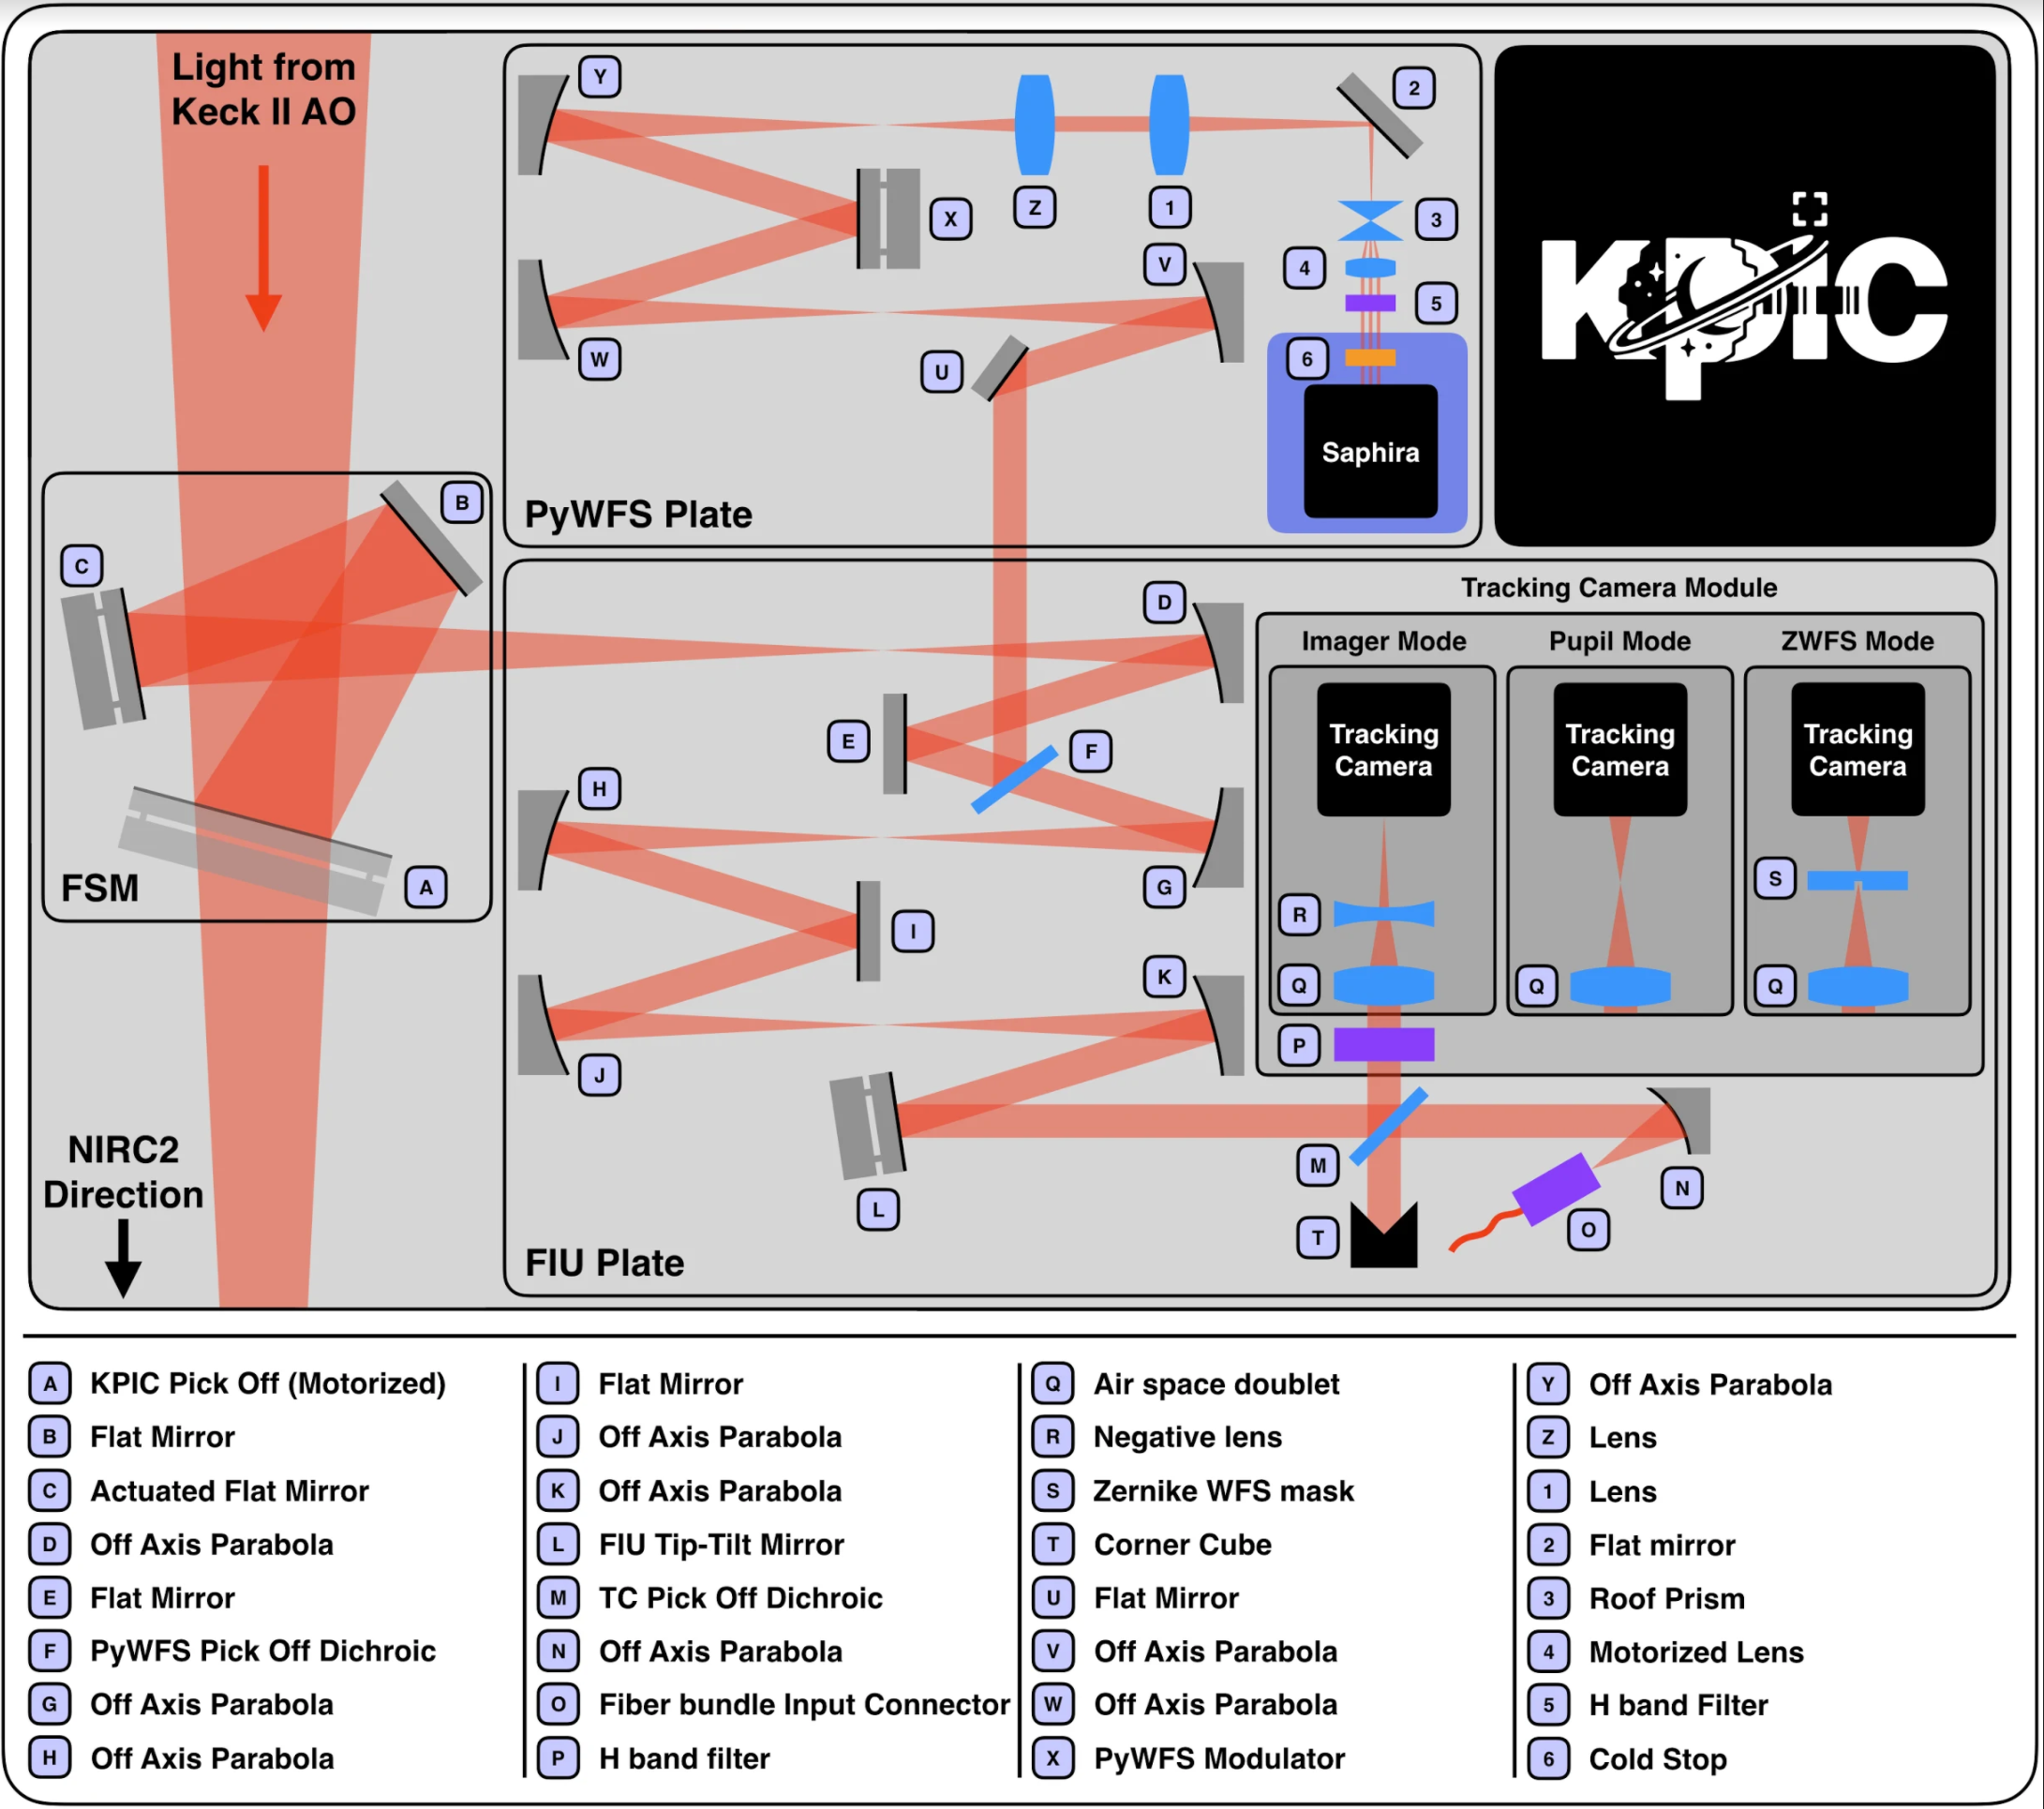
The CRED2 tacking camera is an integral part of KPIC. It can also
be used to monitor the the PSF when operating the PyWFS with NIRC2
independently of KPIC.
There are two possible options to bring up the the CRED2 camera:
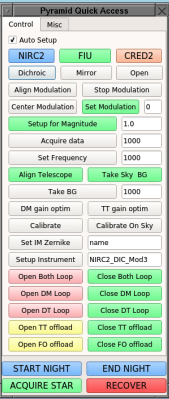
This is a low level GUI that has some additional functionality
with respect to the user control GUIs. The PyWFS quick access GUI
can be used for troubleshooting purposes.
The PyWFS Quick Access GUI is launched from
a vm-pwfsserver terminal as user pwfs:
[pwfs@vm-pwfsserver ~]$ prtcQuickAccess.py
Typical layout of PyWFS control user
interface
An example of PyWFS Quick Access GUI usage is to recenter the
modulator:
Open the AO loops on the PyWFS Loop Control GUIs
Click on Center Modulation on the PyWFS Quick Access GUI
Symptom:
PyWFS Camera (in the PyWFS status) shows red and
says it is powered off. Clicking on it and rebooting/restarting
the camera server does NOT resolve this.
Solution:
Connect to the RTC: ssh -X prtc@prtcserver
Type: showRTProcess. This opens a window, and
the second process from the top is partially crashed
Ctrl-c to restart the process
Connect to the PyWFS server: ssh -X
pwfs@vm-pwfsserver
Issue command: prtcRestartCOM. It kes about 5
sec, then you should be able to reacquire with the camera.