 |
NGS AO Calibrations
 |
NOTES:
These guidelines are written for people who are somewhat familiar with the AO system.
The GUIs are constantly evolving and may not look exactly the way they are presented on this webpage.
The instructions below are written for Keck II AO, but are equally valid for Keck I AO by replacing k2aoserver with k1aoserver, etc.
The 0.6'' plate scale is currently only used by IF. Unless you are doing IF or AO engineering, there is no need to calibrate the 0.6'' plate scale. The steps for the 0.6'' plate scale are in brown.
|
|
-
Check that OBS is running
- From the background pulldown, bring an SC GUI and make sure that OBS is up.
(Or get a login window as k2obsao on k2aoserver:
In the Xterm, type scgui. Don't run the SC GUI task as a background task.)
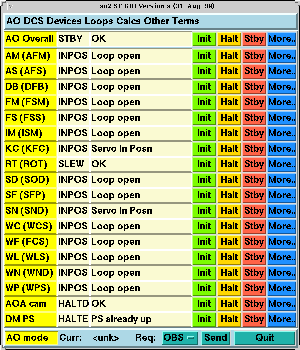
Check on the SC GUI that the status of the OBS stages read INPOS.
A few devices used for LGS AO, like SFW, SFD, TSS and LBS may read DISAB.
| Normal SC gui |
OBS not powered up |
 |
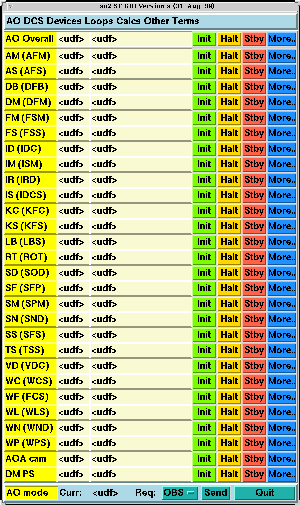 |
If the device status string reads UDF in place of INPOS then OBS has to (re)booted and init-ed.
The OBS startup procedure is described under "K2AO OBS & WFC startup" .
Don't hesitate to call someone from the AO team for more support when bringing up the OBS.
- Bring up MAORI
- From background pulldown : K2 AO tools → MAORI AO Control
- or if this is not available from the pulldown menu :
from the command line on k2aoserver
- Bring up the IDL calibration tools:
- From pulldown : AO tools → Calibration tools
- or if this is not available from the pulldown menu :
from the command line on k2aoserver
- Initialize WFC
- From MAORI → Menu → INIT WFC
- Bring up a WFS Intensity Display and make that sure WFC is up
- From background pulldown : K2 AO tools → WFS intensity display
- or if this is not available from the pulldown menu :
from the command line on k2aoserver
If the counts on the WFS Intensity Display are not updating, you have to reboot the WFC.
- From MAORI → Menu → REBOOT WFC
-
Calibration Setup
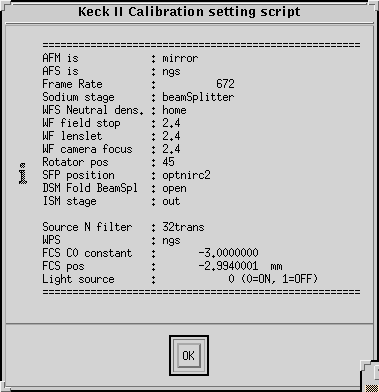
- Run the IDL Calibration setup script:
- On the IDL calibration widget, click on Calibration setup.
- From the popu, select appropriate instrument (e.g NIRC2) and mode (NGS AO, LGS AO)
- Click all the buttons and wait until DONE
- It may be good to keep an eye on SC GUI while the script is running
and watch for FAULT on the OBS stages status field.
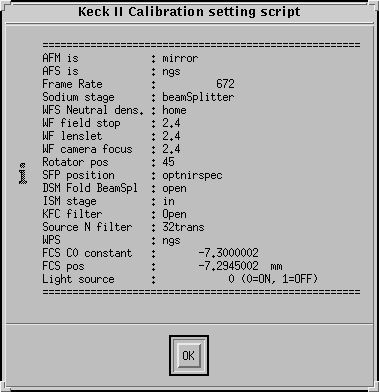
- At the end of the script, a dialog window displays most of the AO
parameters (see the table below).
Check this information and watch for noName string.
If there is any noName string, dismiss the present Calibration setup
widget and run the calibration setup script again from the start.
| Result screen for NIRC2 |
Result screen for NIRSPAO |
 |
 |
- Also, the light source should be on.
- Click OK on the dialog box
- Dismiss the Calibration setup widget.
- Once the script has completed, there should be light on the WFS intensity display (at least 1000 counts/subaperture)
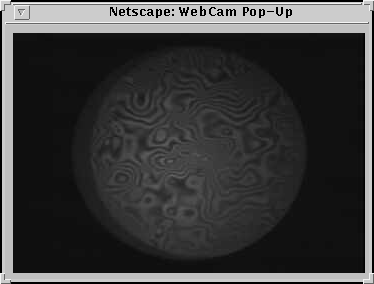
| The WYKO displays on Keck II or
Keck I show the fringes across the DM. In the figure below, AO DM loop is open.
Click here to see the Wyko fringes pattern when the AO DM is closed on a star. |
 |
-
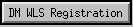
Run the "DM to lenslet registration" script :
This IDL script positions and calibrates the Field Steering Mirrror (FSM) so that the actuators on the DM are matched to the corners of the WFS lenslet arrays.
- Click DM WLS registration on IDL widget menu
- Select instrument
- Click on the buttons and wait until ...DONE
- The before last step of the "DM WLS registration" is the step labelled
"align DM WLS". Here, the script check and optimizes
the FSM alignment. It calculates the error value, re-position the FSM and iterates till
the error be smaller than 1%.
From one day to the next, it is something normal to see an error of
up to 2%.
- Once at the last step, the script has found the FSM reference position which corresponds to
the best DM WLS registration. Hence, the last step is to record and save the FSM origins file.
The new file can be found on k2aoserver: /local/kroot/rel/ao/qfix/data/fsm_origin.dat
A backup of the last file is automatically written to /local/kroot/rel/ao/qfix/data/backups/. There is also a backup created with the name of the instrument.
- Optional: Select the 0.6'' plate scale. Using MAORI → WFS, click on the button next to plate scale and from the pulldown, select 0.6.
- Run the DM-to-lenslet registration for the 0.6'' plate scale.
- Image sharpening (non-common aberrations path)
The purpose of this step is to set the DM actuators (hence shape) in a static mode (open loop) so that they correct the non-common path aberrations.
There are different ways to do it depending on the instrument:
- For NIRSPAO and IF (and also for NIRC2 in some emergency cases):
load a phase map that has normally been created lately and corresponds to the static abberations in the imaging path.
This phase map name depends on the instrument in use.
|
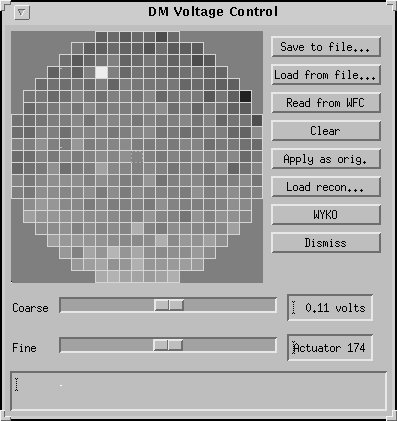
- Click on DM control on the WFC IDL widget.
The DM control widget is shown.
- Click on Clear voltages button.
- Click on Load phase using WYKO
- Select the last saved file for the instrument:
| NIRC2 | yyyymmdd_nirc2.ph |
| NIRSPAO | ddmmyy_nirspec_h.ph |
| IF | zeroes.ph |
| OSIRIS | zeroes.ph |
- Check the returned Wyko phase map (see below)
- Repeat step 3,4,5 three more times.
- Judge on Wyko display that that the fringes are reasonably straight (for the case of zero. If it is not the case,
it requires to iterate step 3,4,5 one or two times more.
- If zeroes.ph was selected and you are happy with the fringes, redefine the DM origin file by clicking on click on Save voltages as DM origin .
- Dismiss DM Control
|
|
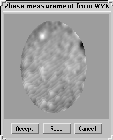
- Checking the Wyko phase map:
The Wyko interferometer that we use to measure the shape of the DM surface is very
sensitive to vibrations. It is necessary to check any phase measurement. Under quiet conditions, the returned phase will look very smooth and does not
present any phase discontinuity. Examples of thoses instances are shown on the left
in the table below. The user would click on accept button for such cases
On the other hand, the returned phase may show the presence of phase discontinuities, and the
user would click on redo. If you are having difficulty in making the measurement due to the
presence of vibrations, you may ask the summit crew to turn telescope oil off.
|
Examples of good returned phase map |
Examples of bad returned phase map |

|

 |
- Problems with the WYKO :
If you have problems with the WYKO software (e.g., no phase map is returned), then you may want to check that the software is running.
You can VNC onto wykopc or k1wykopc (the password is the same as for the k2ao account) and check that the "WYKO-Vision" program is running. If not you may (re)start the program.
If this fails, you can ask someone on the summit to reboot the WYKO PC.
- For NIRC2:
- For IF:
If there is no optimized phase map, we just assume the flat shape is the best one... One can optimize the image quality on KAT by adjusting the focus
(SFP z) and loading DM zernikes (from the DM zernike widget) until the best image is found on KAT.
- For OSIRIS:
- Make sure the DM is flat by loading a zeros.ph phase map from DM control (see above for instructions).
- Define the phase on the DM as the DM origins by clicking Apply as orig.
- Load the best shape using Load voltages from file and selecting the latest OSIRIS calibration file.
- If this does not yield adequate image quality, move the SFP-z and change the DM Zernikes until the image quality is good.
Remember to Define and Save the SFP position (for OPTOSIRIS, OSPEC and OSIMG) and the new DM shape using Save voltages to file.
- Calibrate the WFS centroid origins:
This calibration is to take into account for the non-common path aberrations in the AO system, namely between the wavefront sensor light path and instrument light path.
We aim at finding and recording the centroid origins vector that best
compensates for non-common path aberrations during observing.
Because image sharpening or loading the proper phase map often takes
place at a different pointing origin location than the WFS
Calibration, one must match the SFPz values. Once the image
sharpening defines an SFPz for e.g. nirc2, one must manually
update the SFPz value for the corresponding opt axis position,
e.g. optnirc2 BEFORE running the WFS Calibration.
- Click on
 from the IDL calibration widget. from the IDL calibration widget.
Select the instrument and 2.4 plate scale. Step through the script by clicking on each button.
- At the end of this script, a new file containing the centroid origins
(e.g., 24NIRC2-N2x2.cog) are saved under /kroot/rel/ao/wfc/ControlParms/CentParms/.
This calibrated the WFS for 1x1 and 2x2 binning.
The 2x2 binning file is loaded automatically to the wavefront controller.
- Close the AO loops and check the image quality.
- Optional: Repeat for the 0.6 plate scale (no need to change the plate scale manually, the script will do it automatically).
- Dismiss the "WFS Calibration" widget.
-
Close AO loops on white light source:
- Using the Calibration Tools → Light Source Control, turn HEPA filter OFF
- Using the Calibration Tools → Light Source Control, set the SND such that intensity is as high as the instrument will tolerate without saturating (10trans for NIRC2 and OSIRIS).
- For NIRC2 set filt= brgamma; for OSIRIS, set filt=Kn3.
- For OSIRIS, send SFP to OSPEC and FSMs to corresponding position. An easy way to do this is to bring up the Acquisition Tool, select OSPEC pointing origin and send FSMs to ref. Do not press any other buttons on the Acquisiton Tool!
- Using MAORI, set TT gain to 0.05 and DM gain to 0.1.
- Close the TT and DM loops
- Check that the mean x and y centroids read 0 in the WFS intensity display
- Check the image quality
For more information, please contact
.
.
| |


